 SectionHiker.com Backpacking Gear Reviews and FAQs
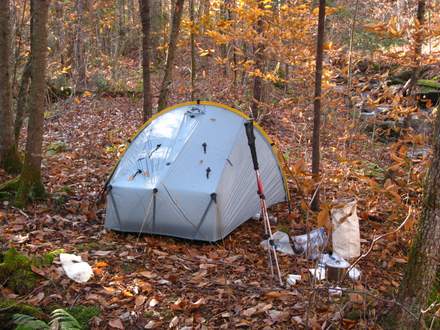
The Tarptent Scarp 1 is a spacious double-walled tent with two doors and two vestibules. It’s a very strong tent that’s able to withstand challenging three-season and four-season weather conditions without any compromises on livability.
Rain Performance
The performance of a shelter in heavy rain is one of the best ways to identify its strengths and weaknesses. Internal condensation, leaks, and rain splatter (tarps) all manifest themselves under these conditions.

One of the nice features about the Scarp is the ability to set up the outer fly, separate from the inner tent. If it is pouring rain outside, this lets you hang the inner compartment out of the rain and keep it dry. I tested this feature last weekend during a very wet hike in the Mahoosuc Range in northern New Hampshire where I set up the outer fly first in the pouring rain, and then clipped in the inner tent. The same holds true for teardown: you can pack the inner compartment first and separately, even if it is still raining dogs and cats.
Contrast this for a moment with more conventional two-walled tents and it’s the exact opposite: your inner tent goes up first and comes down last, so it’s guaranteed to get wet if it’s raining.

As you can see in this picture, the inner tent is suspended away from the outer fly wall. This dramatically reduces internal condensation transfer between the two layers because they don’t touch each other. It’s rather clever. In addition, the clips are useful for hanging wet gear inside your vestibule while keeping it out of your inner sanctum.
Despite heavy rain (one inch overnight), there is very little condensation on the inside of the inner compartment except at the end of my sleeping bag where it touched the inner fabric. I suspect that my feet pushed the inner fabric against the outer fly in this instance, causing moisture transfer between the inner and outer layers. This is easily avoided by repositioning oneself inside the inner compartment, which is luxuriously long and wide for a single person.
However, there was a fair amount of moisture transfer between the outer shell and the outside of the inner compartment as you can see in this misty photo.

None of this water leaked into the inner compartment and the inner surface remained dry to the touch. I attribute it to seam leakage because I have not yet seam sealed the outer fly.
It is still a matter of some concern when it comes to multi-day trips where it might be raining for several days in a row, because it means that you have to pack up the inner compartment wet. While I am confident that seam sealing will have a big impact, I’m also considering spraying the outside of the inner compartment with a DWR spray to encourage such moisture to bead up and roll off the fabric. I can’t see a downside to this.
I should also mention here that Henry Shires, the owner of Tarptent, is reconfiguring the outer fly to help mitigate some of this internal condensation by raising its bottom height to improve airflow. This is in response to requests from UK hikers who also need to deal with high humidity conditions. I may end up switching to that fly myself to further mitigate the issues reported above.
Inner Space
The Scarp 1 has the most comfortable inner compartment of any of the tents that I own. It’s high enough to sit up in and the walls are vertical, maximizing the usable space inside. The roof hangs down like a parachute, which I find rather calming, and the white walls make it feel like you are sleeping in a cloud.
I do have a few suggested improvements for the inner compartment which can be easily addressed with some minor modifications. First off, there are no pockets on the inside walls of the tent. I have glasses and I like to keep them off the floor at night so I don’t roll over them and break them. I will probably address this by sewing a mesh pocket into the side of the tent about a foot off the floor.
In addition, it would be nice to be able to hang damp clothing from a clothesline or a gear loft inside the tent. There are internal gear loops along the top of the inner compartment that can be used to rig a home grown solution for this purpose using a few pieces of cord and cutting open a mesh stuff sack to act as a gear loft.
Tent Stakes
The Scarp 1 comes with six, 9 inch Easton aluminum test stakes to secure the outer fly to the ground. When rigged taught, the outer fly puts considerable stress on the tent stakes and will drag them out of the ground unless they’re firmly planted. I’ve experimented with using lighter weight stakes and have found that you really need the holding power of a long stake, especially in wet ground.
With snow just around the bend, I will be interested to see how effective deadmen are for staking out the Scarp 1. I plan on trying out SMC snow stakes, as well as these neat aluminum T-anchors I found recently, also from SMC, and priced at just $32 for a set of 4.
Vestibules
The vestibules on the Scarp 1 are very narrow. While they are wide enough to store a backpack and your boots out of the rain, I would never try to cook with a stove in one: it’s simply too dangerous. They’re also rather small if you want to take off your wet gear before trying to get inside the dry inner compartment. You need to bring a small camping towel with you to dry up the floor after you’ve removed your wet clothing.
Packing the Tent
Learning how to pack a tent takes some practice. Here’s my method for packing away the Scarp 1.
Remove the inner tent and pack it in a separate stuff sack. If the outer tent has water on it, vibrate it while it is still pitched and the droplets will jump off its drum taught surface. Next, remove the center pole and fold the tent in half by holding the yellow pole sleeve in the air. Lay one side on the ground with the other half on top, dry insides touching. Next, gather all of the pitch lock legs together at one end of the tent and drop the collapsible pole and stakes on the tent and roll it up, folding the sides in as you go, so that the roll is as wide as the length of the collapsed pole. If you’ve packed the inner tent in a separate stuff sack, it will be easy to get the outer fly into the stuff sack provided with the tent.
Summary
I am very pleased with the Tarptent Scarp 1. Besides comfort, this tent’s versatility really appeals to me. The only lingering question I have is how it will fair on a multi-day trip in rainy weather where there are no opportunities to dry off for several days. Other than that, the tent has withstood some challenging autumn weather and I look forward to testing it in snow and alpine conditions in New Hampshire in the coming months.
Disclosure: The author owns this product and purchased it using their own funds.
SectionHiker is reader-supported. We only make money if you purchase a product through our affiliate links. Help us continue to test and write unsponsored and independent gear reviews, beginner FAQs, and free hiking guides.
Great post Philip,
Coincidentally I stumbled across the Tarptent site today and was very impressed by the look of the product.
It would be fantastic to be able to borrow gear like this and use it before purchasing.
Keep up the great blogging, I don't know how you keep it up!
Writing is easy Frank – it's doing all this hiking which is hard. :-)
I like your idea about gear borrowing before purchase. I'll have to think about the economics of that. It'd be nice to fill that niche in a distribution channel.
I always pay attention to other people's opinion of kit I am interested in. This way it feels like its been tried and tested before I get my mitts on it. the more I read about the Scarp the more I like it, even if there are a few niggles
You mention the changes to the fly for the UK market. As I understand it the mk2 fly is lower to the ground to minimise wind driven rain/snow being blown into the vestibules rather than raised to help decrease condensation. The high cut fly was a major criticism in the UK, a few people who bought the mk1 version appear to be upgrading to a mk2 fly while many others have waited until the mk2 version was released before purchasing.
It's an interesting tent though, I'm waiting to see how the mk2 is recieved in the UK.
I was just corresponding with Henry Shires about the mk2 yesterday. The updates provide better venting, a tighter pitch, and more vestibule space. There is also better ventilation at the ends to compensate for the lower fly.
Caution read before buying from Tarptent!! I own a Rainshadow 2 and used it on the JMT for 3 weeks the tent worked great in the dry high altitudes of the Sierra Nevada Mtns with little condensation problems. I like the roominess of the tent but after only 3 weeks the stitching on many of the stays and pole attach sections started coming apart after several field repairs we were able to complete the hike. I sent the tent back in for repair to Tarptent and to my despair I found that Tarptent took almost a year to repair it! After sending multiple emails to Tarptent they finally responded after I threatened to come by there shop in person to talk to someone. They stated that they had some kind of weather incident and that there shop was damaged and they could no longer find my tent. Low and behold they finally agreed to send me a new replacement tent but what arrived was my old tent and a message stating that they found the old tent in a corner of the shop. The tent had been returned with two large 10" rips to the bottom and I had identified the areas of repair needed but only half of them were re-stitched. I again emailed Tarptent to see what could be worked out and they have at this time still failed to respond they did although send me a tube of silicone and some patch material which I believe is an unacceptable way to handle the repair. I had heard good things about Tarptent so I am not sure if this is an isolated issue but their lack of communication and fairness to my issue should be considered before buying one of their products.
I've never had any problems with tarptent products and I've found Henry to be extremely responsive to customer issues (not just my own.) Did you ever speak to Henry on the phone about your experience? I'm sure he'd want to hear from you directly and not just via email.
I have called and left several voice messages with no reply. As you know all calls usually go direct to voice mail so I never had a chance to talk to someone.
re: Jim, I need to respond. What he neglects to mention is the prior history of what I consider us going above and beyond the call of duty.
Back in 2007, he ordered a Rainbow. Then he returned it a few weeks later and wanted a Double Rainbow. So we sent him a Double Rainbow. Then, a few months later he requested custom trekking pole handle adapters so we send him those (no charge). Then several months later, after using the Double Rainbow for 5 days in the field, he decided that he wanted to "trade up" for a Rainshadow 2. He sent back his used DR and we send him a new Rainshadow 2 (no charge, again). We were left with a used DR which could no longer sell. Then, two years later he sent back his Rainshadow 2 for repair. At that point, we admittedly lost his package for many months. We were in process of moving into a new office and temporarily working out of a tiny garage with everything in storage. I did eventually find his box and spend a couple of hours repairing the things I saw that needed repairing. One part of that–a grommet tear out which took a few minutes to fix–was our responsibility. The rest of it was his wear and tear after many weeks of use. No charge, again, for the repair. Then he informed us that there were floors tears and that it was our fault. Maybe. Or maybe not. I certainly never saw any floor tears when I worked on it. At his request we then sent him some scrap fabric to do a glue repair. Then, not happy with that, he wanted us to sell him another Rainshadow 2 "at the lowest price".
So..I will accept responsibility for taking much too long to repair his Rainshadow but at some point we are just not responsible. Selling him another Rainshadow 2 keeps this obviously broken relationship going and at this point we just can't continue. I would hope that he finds another line of products better suited to his needs.
Henry Shires
Tarptent
I'm glad to read Henry's response. It's nice to see, as Paul Harvey would say, "the rest of the story".
I have two Tarptents, a Double Rainbow and a Sublite, and in my opinion, his products are the best I've ever used. I've found Henry to be friendly and helpful and his customer service ranks right up there with the quality of his design and work. If I ever get to that part of California, he is definitely on my list for a visit.
I check out plenty of new tents online and still cannot find anything that matches the weight, size, functionality, and value that I've found in Tarptent's products. The Double Rainbow weighs less than three pounds and has two doors and two vestibules. My Sublite is just over a pound and still large enough for my seven year old grandson and me.
I purchased the Sublite around the time I'd planned to backpack Kesugi Ridge in Denali State Park a few years ago. Henry was willing to FedEx the tent to me in Alaska on short notice so that I'd have it in time for my hike. As it turned out, the weather wasn't going to cooperate and I had it sent normal delivery to my home.
I love Tarptents products and I've always had good experiences with them and their customer support. Like any business, I'm sure there are occasional instances where products are defective, but I trust Henry's honesty and sincerity when it comes to resolving such issues for the customer's benefit. I've always felt that when I buy a product from Tarpent or any other cottage manufacturer, that I'm entering into a long term relationship with them that goes way beyond a single purchase…which why I've bought multiple products from many of the great companies that serve this market.
Re: Jim report / Henry’s Response back in 2011 … There’s ALWAYS two sides of the story and Tarptent’s handling of Jim’s issues goes FAR beyond the norm, and is a welcomed breath of fresh air. Well done Henry!
I’m planning to buy a Scarp 1 in the next month or two. Based on all the reviews I’ve read, I’m looking forward to it when I save up the money … oh, BTW … planing to use it on a LONG bicycle expedition … have already ridden NYC to LA to Fairbanks, AK… rest will Involve Alaska and the rest of the world … 8-) .
In the interest of disclosure, I’m the David who posted above on May 13, 2011.
A year ago, I loaned my Tarptent Double Rainbow to a friend who managed to break one of the Easton aluminum poles when striking the tent. I contacted Henry Shires and told him what happened and he sent out a replacement completely free of charge. In my email to him, I also mentioned that I thought it would be nice if my Tyvek Sublite had a loop inside at the top to hang a light and asked him how I could rig one. Along with the replacement pole came a custom made piece with loop and hook and instructions on to attach it to the inside ceiling of the tent. Henry refused payment for any of this.
In my experience, Henry Shire’s products and customer service are absolutely top notch.
Just heard about Tarp Tent and keen to get the Scarp 1. A Mountaineering Instructor I’m employing is about to use one in what looks like appalling weather here in the UK. If he stays dry and the tent holds up to 70mph gusts then I’ll purchase. He sounds confident it will. With many nights spent under canvas delivering Mountain Leader courses this could be the tent I’ve been looking for :-)
Yep. I’m gonna add a comment to a review that’s almost 10 years old, because I have a Scarp1 that I purchased in 2012 and still use in 2018. It’s been outstanding in Mid Atlantic conditions, all seasons, my only gripe is I haven’t yet purchased the mesh interior for summer use. I hike solo most of the time, and really have grown to appreciate its weather-worthiness. Big thunderstorms, wind driven snow, it’s handled it all very well. I’ve had very little problem with condensation, especially if I orient the fly so the open vestibules face into a breeze (hot summer night trick). Plenty of room for me & a full size inflatable pad and the usual junk I bring in the tent at night. Great head room. Double vestibules make pack & boot storage easy.
Being able to adjust the floor of the tent to increase the size of the vestibule is a brilliant touch, and is handy when camping in extended rain.
Yes it is a bit heavier than many other solo tents out there but for six years, this has been my go-to shelter. If weather worthiness is high on your list of priorities, I would definitely give this one a go.
The SCARP 2 is my 4th Tarptent. If you go to Backpacking Light and to the “Winter Hiking” forum search for SCARP 2 Winterized or Winterized SCARP 2 and you will see how I moved the optional crossing piles UNDER the fly for much more support for high winds and snow load.
This setup is nearly “bombproof” and I have tested it in steady 40 mph winds with gusts to 65 mph according to the National Weather Service. You also need 4 stake loops on the fly hem to keep it from flapping in high winds, as you would on any tent.
BTW, why would you not leave the inner tent attached to the fly for a much faster setup? I do it with my Scarp 2 and Moment DW.
Because you took it off before packing it away in the pouring rain so it doesn’t get wet.
Hi, i live in North Wales, UK. How much in UK £ pounds money, and how much would it cost to deliver a ,Scarp 1 (with the normal solid inner) . Or is there supplier, shop, address in the UK I could buy a Scarp 1.
Thank you,
Mike.
suggest you contact the manufacturer. I don’t sell anything.
Philip, Other than the difference in size, how would you compare the Notch to the Scarp when assessing features for 4 season use? Thx, as always.
The Scarp has much more internal volume. People use the Scarp 1 as a two person tent! Try that with a Notch and you’d have to stack the people on top of each other.
I’m interested in the Notch for 4 season use. I would only be “myself” ;-) I’ve seen others use it, but value your assessment..thx
Too hard to set up in snow. Think about all of the deadmen required. To confining. Fine for three season though.