 SectionHiker.com Backpacking Gear Reviews and FAQs
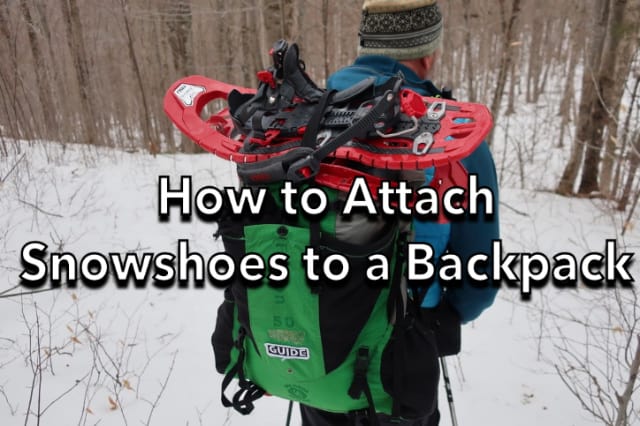
There are many ways to attach snowshoes to a backpack, although some of them are more energy-efficient and comfortable than others. How you go about doing this depends on the characteristics of your backpack and the places where you can attach or carry snowshoes. For example, it is easier to carry snowshoes on backpacks that have two side compression straps, so you can slip your snowshoes underneath them when you don’t need them. If you’re shopping for a new winter backpack (see our recommended winter backpacks), it’s important to choose one that will let you carry the extra bulky winter gear you expect to need like snowshoes, crampons, skis, ice axes, or an avalanche shovel.
Let’s take a look at some examples to illustrate how you can carry snowshoes on a backpack.
Side Carry

I like to strap my snowshoes under my backpacks side compression straps because it keeps the weight on my hips and is less likely to get caught on vegetation along a trail. You really need snowshoes that have a binding system that folds flat, like the ones on MSR’s Lightning Ascent or Evo Ascent Snowshoes, so you can keep the snowshoe crampons pointing out and so they don’t cut into your backpack.
If your snowshoes have bulky bindings, which is frequently the case with snowshoes with boa binding closures, you can still attach them to the sides of your pack with the bindings facing out, but there’s a much greater risk that they’ll get snagged on vegetation. You also have to be careful with the snowshoe crampons if you use a backpack made with thinner materials, so it doesn’t slice into them.
Front Carry
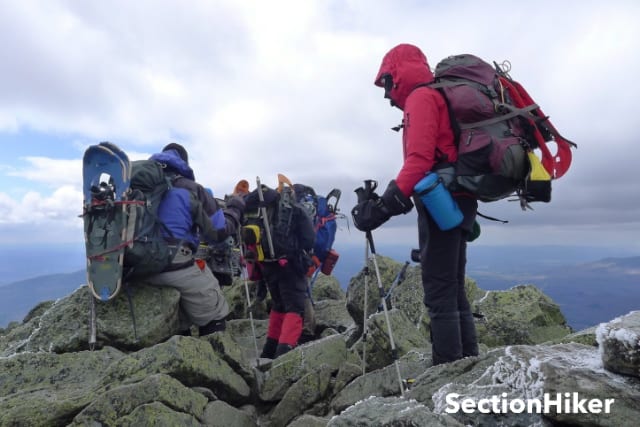
There are a number of ways that you can carry snowshoes on the front of a backpack. I don’t personally like this method because the weight of the snowshoes (they usually weigh 4 to 5 pounds per pair) can pull you backward and off-balance. But it still works if that’s the only way you can attach them to your pack.

If your backpack has an open front pocket, you can slip the bottom of your snowshoes into it. You’ll still want to secure the tops of the snowshoes so they don’t fall out or sway back and forth as you walk. This method can be problematic because it can snag and rip the mesh if it comes into contact with your snowshoe’s crampons. The crampons can also punch through the body of your backpack, especially if you slip and fall onto your pack.
Some backpacks have compression straps that can connect to one another the front of a backpack, not just its sides. Granite Gear’s Crown 3 60 and Blaze 60 have this property and it makes it very convenient to attach snowshoes to the front of your pack. Deuter makes some backpacks that have this capability and many winter/mountaineering-style backpacks do as well. It’s definitely something to look out for because it can be used to connect bulky gear, including snowshoes to the front of the pack.

If your backpack doesn’t have compression straps on the side or ones that run around the front of the pack, you can usually connect elastic cord to the front of your pack to hold snowshoes. For example, many ultralight backpacks have tiny webbing loops surrounding a front mesh pocket that you can tie elastic or static cord to. I do this with backpacks from Gossamer Gear, for example. If you use static cord, you can add a cord lock to tension it.
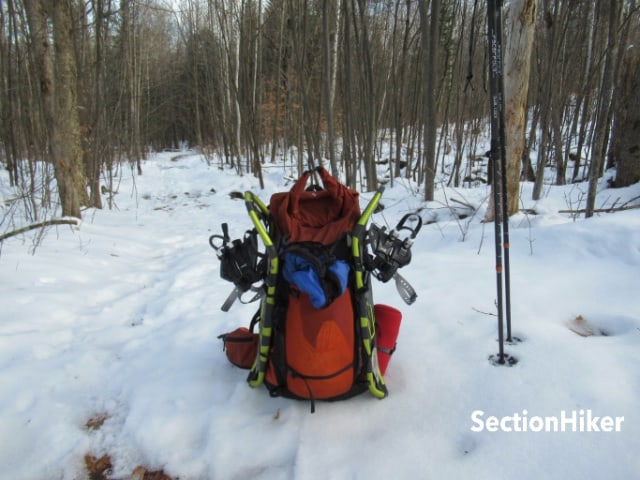
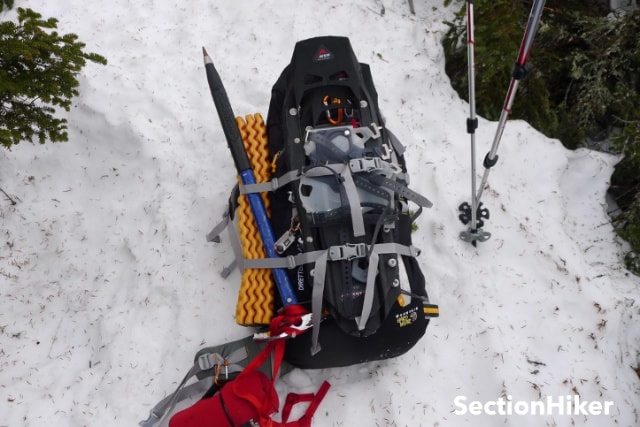
Top Carry
If your backpack has a top lid pocket, you can usually secure your snowshoes underneath it. This can make your pack a bit top-heavy and it may make your snowshoes more susceptible to getting snagged on vegetation, but it works.

The same holds if you have a roll-top backpack, like the one in the top photo of this article. Most roll tops have a Y-strap that runs over the top and you can secure your snowshoes under it.
Conclusion
I’ve demonstrated three different ways that people attach snowshoes to their packs on winter hikes using a side carry, a front carry, and a top carry. While all of these are popular, which one you use really depends on the characteristics of your backpack (ie. compression straps, top lid, Y-strap, etc) and your snowshoes (lay-flat binding or bulking binding, sharp crampons or not). That said, winter hikers and backpackers can be quite ingenious in how they attach snowshoes to a pack. There are probably a million ways to accomplish it, so don’t feel you have to conform to the norm.
SectionHiker is reader-supported. We only make money if you purchase a product through our affiliate links. Help us continue to test and write unsponsored and independent gear reviews, beginner FAQs, and free hiking guides.
Oh how I wish we needed snow shoes in Alabama!
But I still enjoyed the article. When there is snow in Alabama it is too cold to hike for me.
I love when tall people carry them on top and clear out all the snow on the trees!
That’s been me over the years, but not because I’m tall. I ski or walk under a tree, and it dumps its snow load on me. There can be others in front of and behind me that won’t get dumped on. The Hubs thought I was kidding until we the wind kicked up and blew drifting snow all over me but bypassed him
It’s enough to give a person a complex!
One recommendation I don’t think Philip spelled out here is this: make sure your snowshoes (and any other gear you lash onto your pack) are secured with a rope, biner, or strap that goes THROUGH the snowshoes/item somehow so that if your lashing fails the item will dangle from your pack and you won’t lose the item somewhere on the trail without noticing it fell off. I have a friend who lost his snowshoes somewhere on the way down from Mt. Washington when he was off-trail and didn’t notice they got knocked off his pack. Another friend lost someone else’s entire tent this way.
One more recommendation: if you are looking for a decent pair of snowshoes that have been out in the elements for a few years and want to go on a fun scavenger hunt, I know of a pair of snowshoes located somewhere on the west side of Mt. Washington.
In the summer following a particularly heavy snow year, I hiked up ski runs & skied down. One day, I found enough money to pay for my gas, a rental ski, several ski poles, two sets of car keys, and a granola bar.
I didn’t eat the granola bar. I was an impoverished college student, but even I had some limits.
Definitely. I side carry on Granite Gear Crown 2 60. I stick the tails in the side pockets and use the compression straps to hold them on. Per your advice, I put the top strap through the shoe and over the edge closest to my back. This also keeps the shoe from digging into my shoulders.
good idea!
I put them on the front of my backpack, held in place with a PackNet.
Have strapped them on horizontally and vertically to the front and laterally to the top.
Yes, you don’t want them sticking above your head as they will snag on branches and logs you duck under (NW coast).
I am switching to attaching then horizontally at the bottom. This has the following advantages:
– your pack sits on them when you set it down, keeping it dryer and less muddy near trailheads.
– You can easily access your top of pack for spare clothes etc, without removing your snowshoes from the pack. When mixed climbing at higher altitudes or in extreme conditions a couple of minutes fiddling with remounting snow shoes matters.
– I have a mesh pouch on the front where I store my layers. And want to keep the front unobstructed for quick access to the mesh pouch.
The complexity is to also mount your ice axe, snow shovel and unused poles above and around the snowshoes as independent attachments.
Regarding a security tie for anything outside of the pack. I met a group sharing a tent and the guy with the poles had them lashed outside without a second security tie. He lost the poles and was extremely unpopular.
For security ties I use mini biners from Mountain Summit – the objective is to not have a knot, but instead a heavy shock chord loop clipped in that can’t fail.
Yeah – I own winter packs that have a LOT of external attachment points for that precise purpose. It’s so much easier to use a winter pack that is designed to have a lot of stuff hanging off of it. That’s not a criticism. Everybody has their own system. But if you hike a lot in winter, it’s totally worth using a more specialized pack.
I actually like strapping them to the bottom of the pack with the spikes facing down.
This keeps my center of gravity low and also allows me to put the pack down on pretty much any surface without worrying about the pack sliding away or being damaged.
Elastic mesh works pretty good
https://www.amazon.ca/Motorcycle-Elasticated-Luggage-Storage-Adjustable/dp/B0952N75JM/ref=asc_df_B0952N75JM/?tag=googlemobshop-20&linkCode=df0&hvadid=459345175880&hvpos=&hvnetw=g&hvrand=3740376626559301666&hvpone=&hvptwo=&hvqmt=&hvdev=m&hvdvcmdl=&hvlocint=&hvlocphy=9001317&hvtargid=pla-1392372793654&psc=1&mcid=d4c2494cce5030438eb0be5808812b98
I prefer the balance of the side strap method, but ultimately the lack of access to the side pockets (especially water bottles for winter travel) have forced me to use the bottom method instead. This seems to be the best compromise.