 SectionHiker.com Backpacking Gear Reviews and FAQs
There is really no substitute for experience when it comes to winter hiking, backpacking, and camping. You can read about it in books and watch videos, but the best way to learn is to go out with an experienced friend who can teach you the ropes. Here are a few things I’ve picked up over the years that you can try your next time out. These are shortcuts and hacks I’ve picked up from others or invented myself that can make winter hiking and backpacking less expensive, safer and more fun. Experiment, by all means, but bring a safety net. It’s the only way to become an expert.
1. Pre-hydrate before winter hikes by drinking a liter of water or juice before you start out.
Drink a liter of water on the way to the trailhead before a winter hike. This is above and beyond whatever coffee and liquids you consume at breakfast. You’ll pee more, but you’ll stay better hydrated and warmer. You lose a lot more moisture than you realize in winter, by sweating and exhaling the moisture in your lungs. It’s also hard to force yourself to drink enough on a winter hike, so drinking extra upfront will keep you better hydrated during the day.

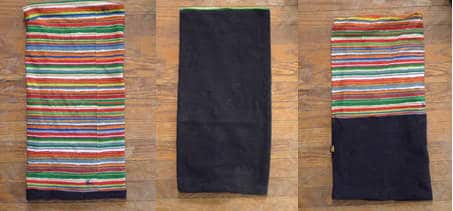
2. Warm up with a neck gaiter.
Neck gaiters are one of the most underrated winter hiking insulation layers. If you’re feeling chilled, put one on around your neck. Major veins and arteries pass through this area and covering them up will make you quickly feel warmer. You can use a thin neck gaiter or a Reversible Polar Buff for even more effect. Neck gaiters are also an excellent way to increase your comfort inside a sleeping bag or a backpacking quilt because they prevent drafts from leaking around your neck and upper chest.
3. Wear exam gloves inside fleece gloves.
Winter hikers can use up several pairs of fleece gloves on cold-weather hikes because they get saturated with body sweat. You can prevent this by wearing nitrile or latex exam gloves inside a fleece glove or mitten. Your hands will still sweat, but the sweat will stay in the exam gloves and keep your gloves drier. Just don’t take the exam gloves off until you get inside someplace warm or they’ll get very cold because the moisture will quickly evaporate in the drier winter air. Evaporation sucks heat out of your hands and they’ll get really cold.

4. Insulate your water bottles with wool socks.
There’s no need to buy expensive neoprene bottle parkas to insulate the bottles of hot water you store inside your backpack. Wrap them up on a heavy wool sock and they’ll stay warm for most of the day, nestled inside your backpack with your extra insulation and gear.

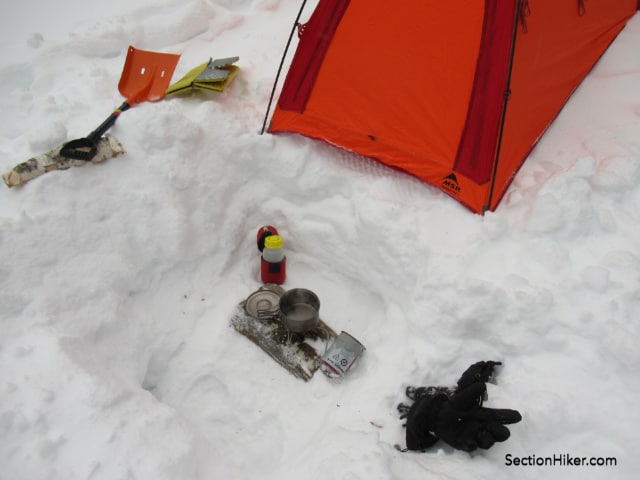
5. Dig a front porch for your tent.
With your avalanche shovel, dig a hole outside the front door to your tent, about the depth of your legs, below the knee. This lets you sit with your back inside the tent, but dangle your legs in the pit, making it easier to take off and put on your boots. Not only is this more comfortable, but it helps to prevent the snow and ice that clings to your boots from entering your tent, where it’ll cause internal condensation. A front porch also provides a good windbreak for cooking and melting snow.
6. Wrap duct tape around liquid fuel bottles to help prevent frostbite.
The fuel inside liquid fuel stove bottles is gasoline which freezes at a lower temperature than water. If you touch the metal of one of these bottles on a subzero night with bare hands, there’s a good chance that you’ll get frostbite since the cold will be conducted through the bottle’s metal walls. This happens very quickly. Wrapping the bottles in duct tape helps insulate them but is also a tactile reminder that you should always wear an insulated glove when you touch a metal fuel bottle.

7. Bury your insulated water bottles at night.
Snow is an excellent insulator. One way to keep your insulated water bottles from freezing at night, instead of sleeping with them in your sleeping bag, is to bury them in a small cave that you dig into the snow. Turning them upside down is also recommended. Make sure to “close the door” to the cave to keep them well insulated and mark the spot so you can find it easily the next morning.

8. Use supermarket bags as deadmen for pitching tents.
When you pitch a tent on snow, you should stake it out. But snow doesn’t provide a very good grip, so you need bury a snow stake (usually sideways) and stomp it into the snow to create a solid anchor point. Called “deadmen“, these snow stakes can take 30 minutes or more to harden in place. A faster and lighter-weight alternative is to bring plastic supermarket carryall bags with you, fill them up part-way with snow, tie them to your tent’s guy-out points, and then bury them. They set up almost immediately, so you can get in your tent and out of your wet clothes faster. Be sure to chop the bags out the next morning with your avalanche shovel and pack them out to leave no trace.

9. Bring two pairs of ski goggles for above-treeline hikes.
You often need to protect your eyes from freezing mist, sun, and wind when you hike above treeline in winter. But they often fog up, especially if you’re hiking hard and perspiring, making it difficult to see. One solution is to bring two pairs of goggles instead of one, so you have a spare if yours or your partner’s become impossible to see through. I’ve used this trick to summit some challenging winter peaks that I would have had to bail on due to goggle fogging. I also recommend putting googles away when not in use and not putting them on your forehead, which is wet with perspiration, because they’ll ice up.

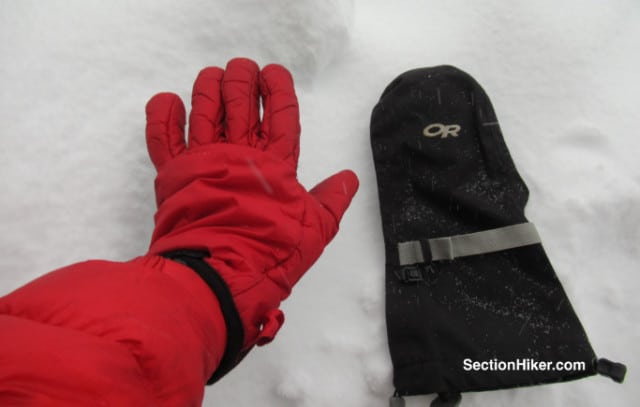
10. Wear high dexterity glove liners inside shell mitts.
Most shell mitts and heavily insulated winter mittens come with mitten-shaped liners. Replace these with gloves that have fingers, so you can take your hands out of the mittens to perform tasks that require more dexterity.
That’s just a taste of the little tricks you can use to make winter hiking safer, more comfortable, and more efficient. Stay tuned. Want more great winter hiking and backpacking hacks? See 10 More Winter Hiking and Backpacking Hacks.
Updated February 2024.
SectionHiker is reader-supported. We only make money if you purchase a product through our affiliate links. Help us continue to test and write unsponsored and independent gear reviews, beginner FAQs, and free hiking guides.
Great post. I’ll bet it gets lots of comments. My two: 1. The most important winter “hack” is one you’ve stressed before: pay attention to weather and terrain and cancel trips if the weather outlook is too extreme. Do extra planning to map out bail out routes if forced back by weather. Even minor injuries can be real threats in extreme weather. 2. Wear clothes (including base layers) with zips or buttons to allow venting off excess body heat and sweat. Managing excess heat to avoid getting chilled by sweat is just as important as insulation.
Both great tips, too!
Both good tips, but neither are hacks, which this article is providing.
True. None of this involves unauthorized modification of computer code to accomplish purposes contrary to the original design.
Another important tip is that when you stop hiking for any extended period of time, that you put on your puffy, or other warming layer, in order to trap the heat that you just built up hiking. You always have to keep in mind that it is much easier to stay warm then it is to re-warm.
I always bring an aluminum seat cushion on my winter tours in the Alps. It weighs nearly nothing but serves perfectly for short breaks in the cold. It isolates your butt from freezing in the snow and the humidity on the ground. Plus it stowes awain in a second.
Are you sure it aluminum or is it a foam pad with reflective aluminum sprayed on one side like a Thermarest Zlite sol, which is what I use.
It’s this product: https://www.amazon.com/TATONKA-aluminum-seat-cushion-silver/dp/B000G4XI1S
Agreed. In the states we use a similar product. Sometimes aluminized sometimes just closed cell foam. One more use for these in cold weather, when you’re at camp talking around a fire with others put this under your coat against your back. Fire in the front, this at your back… lifes good.
If you can get exam gloves powdered on the inside, I would, then turn them inside out so they stick to your hands and slide in/out of the shell/glove much more easily.
I really appreciate your article. Thanks, for sharing your words of wisdom. Your articles are rich food for thought every time I come across them and are also a true inspiration for those of us who want to get better every day. Thanks for spreading your experience.
Really enjoyed this article. I live in the south where we rarely encounter snow but do get some cold mornings. This type of wisdom isn’t widely available.
:-)
We’re a short drive away.
Nice collection of tips!
I elaborate the neck gaiter thing a bit. I usually carry at least a couple of different weights/thicknesses. Sometimes i just need something thin when moving; like a thin half Buff. Can layer it with something a little thicker/warmer, like a Smartwool, during quick stops. For longer stops or when the wind kicks up, a full fleece version helps. Same with headwear. I mix and match head-/ear-bands, a windproof OR Peruvian fleece hat (with ear flaps), and a down beanie.
I still almost never see them mentioned, but Zippo catalytic warmers that run on lighter fuel are the bomb. Small ones weigh two ounces, run about six hours on just over .5 oz. of fuel, and large ones are about three ounces, and burn for 12 hours on a shy ounce (22 ml.) of fuel.
These are stiff metal things, half the size of a cell-phone case or so, and need oxygen for the catalytic “burn” to happen, so you can’t use them like the chemical warmers to stick in your boots or gloves. But put your damp boots in a plastic bag or stuff sack with the top open, drop a warmer in each boot when you go to bed, and, presto, dry boots in the morning. You can also just stick these in your jacket pockets (along with your hands) while you’re sitting around camp to warm up your hands.
Got to try some of those! Sounds like a great way to dry boots.
When i first got them, i tested them out at home on a 5ºF night. Wetted the inside of my boots (LL Bean Wildcats) down pretty well with water in a hand sprayer. Took the insoles off the bottom and stand them up vertically in the boots. Put the boots in a plastic bag (to contain the heat a bit) that came up just above the top of the boots. Left the top open so water vapor can escape. I think i used the large size Zippo, one in each boot. Totally dry in the morning (~ 9 hours later).
I can imagine if the boots were thoroughly soaked, this method might not be completely successful. But still better than any other available alternative short of tending a fire all night.
Hey cool blogpost! These are actually very useful tips instead of the usual captain obvious lists you see everywhere :)
That’s because we actually do it.
Great tips! Thanks for this post.
Do you have pros and cons of different types of winter camp shoes? Have you ever seen anyone glue soles to down booties?
I don’t bother with them myself although I’ve tried them. I just keep my boots on and put my feet on a foam pad if they’re cold.
No. But I’m sure they have.
Look at the booties from 40below.com
I have sewed soles to down booties. Works great if ground is dry but I haven’t yet found a good material that is light, durable and waterproof. Maybe a heavy duty Goretex?
I used to carry disposable shower mesh shoes as camp shoes. They have a very thin sole and my hiking buddy and I were surprised at how well they insulated from frozen ground. Now, I just put my boots back on for those midnight ‘lonely tree’ breaks.
Great tips.
The only one that I’m wary of is #5 the front porch. Given I’m a 58 year old man I never make it through the night without a pee break. And I’m not a pee bottle user. I could seem myself doing a header at 3 AM in that hole!
Over the years I’ve learned to put most of my clothes in my pack on winter ascents even when I’m cold starting out. Once I reach the summit or a campsite and my heart rate slows down, I quickly throw on additional layers and have less issues with sweat.
Cycling arm warmers – my torso has no problem staying warm when carrying a pack, and I typically wear a short sleeved base layer to strip down to when the going gets steep. When there’s no wind, that works superbly. With wind, my arms freeze which eventually makes my hands clumsy. Not all arm warmers actually block the wind so I’ve learned when checking out garments, stretch the fabric over my mouth and blow hard. If I can’t blow air through the fabric, it’s truly wind proof.
Great tips! My son amd I slept in a tent on the snow for the first time. Digging out the front porch ended up being super convenient, and the snow anchors worked like a charm. Thx!
Use soft surgical tape to cover your nose,cheeks to prevent wind burn.
I have a question about wearing exam gloves inside of fleece gloves.
Won’t that prevent moisture from wicking away from your skin, therefore making them colder? Do you have to change them out from time to time and replace them with dry ones?
I’m willing to try this, but I would prefer using something that can breath.
Nope. You don’t lose body heat if the sweat can’t evaporate and you prevent heat loss on the outside of the latex gloves. It’s a vapor barrier (vbl)
Great post Phil, so much useful info (as always). Apologies in advance for the product mention but on tip #9 I’ve switched to Julbo goggles with their “superflow” system where the lens can be extended a fraction of an inch from the frame which creates ventilation and pretty much eliminates fogging, at least for the 2 years I’ve had them. They also have light sensitive lenses which darken or lighten based on conditions. I’ve had really good luck with their glacier glasses and mountain biking glasses as well. Really good eyewear.
Not a big deal but just a heads up…if you enter NYS for any winter camping adventure, be sure to bring your own plastic grocery bags if you want to use them for deadmen. Our state has “outlawed” the plastic bags in all grocery stores so you’ll no longer find them in the Empire State.
#5! I see so many winter campers that don’t know this simple trick. It works great especially if covered with a vestibule
It really does.
Acts as a cold sync too!
I’ve heard this too but I always wondered if a hole that small really makes a difference.
Good points and comments. I wanted to add some thoughts on nimble layering.
I’ve done forty some winter trips in the Grand Canyon (where exiting to
South Rim trailheads – Tanner, New Hance, Grandview, Kaibab, Bright Angel, Hermit etc.) means major ascents (3,000’+) with significant shade (below massive north facing cliffs).
What is worth passing on is that maintaining steady body temperature during the ascent is key (not the same thing as steady velocity) and having layers you can adjust without taking your pack off pays huge dividends.
I start with a light poly balaclava with a techie nylon baseball cap on top of that ( cap offers sun protection and keeps precipitation off my glasses). I layer and adjust two light pile caps on top of that. Those two pile caps are removed (and put in a pants pocket, or belly pack) or put back on often and offer a broad range of comfort.
Handy in a belly pack or side pocket is a heavier wind block pile balaclava to add quickly if pausing. A wind vest or light shell can be added or removed while sitting on a rock and slipping out of the shoulder harness of the pack.
Worth mentioning. As you arrive at campsite, soon as possible (after setting up tent or bivy sack) swap out your briefs and base layer shirt (and perhaps base layer bottom) for dry ones. Time you have bare skin can be very minimal if you set everything out beforehand and the end result is well worth it.
In the morning reverse the process when you are ready to leave camp (also a good time to use a wipe on your private parts).
Late winter/early spring is a great time to sample snow camping, build your skills if you are new at this. Mild temperatures (20 or 25 at night, 40 in the afternoon) aid your learning curve.
Socks are worth thinking about when cool/cold weather camping. Good to have a second pair of “sleep” socks to wear in the evening, to change to.
There is also the possibility of drying your (perhaps damp) daytime socks (or briefs) by bringing them into the sleeping bag with you and laying them on your chest (theorizing that warmth rises from your body and you are sleeping on your back)
This is possible but good to think of the nuances, this process is not a gimme and if not mindful you can klutz out.
Make darn sure you are warm in the bag before bringing the socks in or you may wind up chilling yourself instead of drying the socks.
Consider using a brush to knock snow off your tent, bivy sack, pants or gaiters. Do we want to use our gloves/mittens to clear snow?
The brush also comes in handy for clearing ski bindings, and skis, of lingering snow at the end of day. Also the pinholes of 75mm Nordic boots. Not letting that snow set up and become problematic the next day.
The brush can be a simple wood handled car snow brush with the scraper cut off. Alternatively, Coghlan’s makes a dustpan/whisk broom plastic combo. The brush is similar to a brush for painting houses.
One caution. Not sure I would do this with siltarp material.