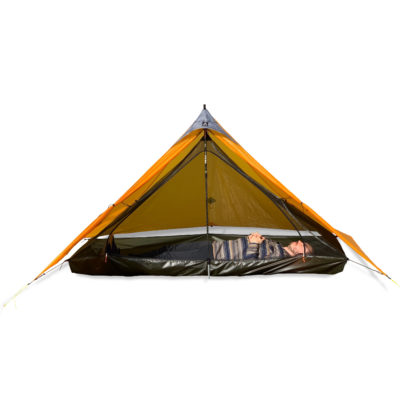
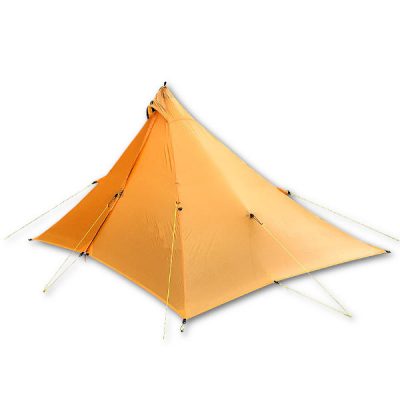
SUPERMID ™ | 9.2′ X 9.2′
“Top Pick for Winter Use.”- Outdoor Gear Lab
WEIGHT: 19 – 26 oz | 540 – 740 gm
PEAK HEIGHT: 69″ / 175cmSQ FOOTAGE: 70 + sq ft | 6.5 sq m
SLEEPS: + GEAR
The SuperMid ™ provides bombproof protection from rain or snow for four people. It can be used as a marvelous palace for two, a basecamp shelter for cooking, a ski touring tent, or even a lounge pad. But don’t let it’s versatility and palatial size fool you, this thing is bomber, having earned Outdoor Gear Labs “Top Pick for Winter Use.”
The SuperMid accompanied Erin and Bretwood Higman on their record setting 4,000 + mile hike from Seattle to the end of Alaska. Check out their blog for a pic on a SuperMid still standing after being buried to the top with 400 lbs of snow!
We included their 300 + nights of daily living feedback in their SuperMid into our design to make sure this thing stands strong in all types of weather.
Top UltraLight 4-Person Tent
Best 4 Person Backpacking Tent 2024
“We believe in the top-of-the-line quality of MLD’s ultralight pyramids, and SuperMid in DCF is Adventure Alan’s 4P choice! At 19 ounces, it’s the lightest weight option in its category. Split four ways, that’s less than five ounces per person!”
“The Mountain Laurel Designs SuperMid earned a perfect ten for livability – it has a much larger footprint than all the other shelters we tested – and it can sleep four people….The Mountain Laurel Designs SuperMid in SilNylon is the best value pyramid shelter we have tested.” – OUTDOOR GEAR LAB
To make our pyramid tents so strong, we use an MLD Exclusive panel design that eliminates over 40% of seams vs. other designs. Thanks to our innovation the side panels can be joined near the peak by a much shorter horizontal seam making our tents stronger, and lighter. Does it work? From how often our panel design has been copied, we’d have to say yes.
FEATURES
• 70+ sq/ft of usable floor space perfect for four or a palace for two or three
• ONE oversized peak vent design is best: Pitch the rear of the SuperMid into the wind to prevent rain and snow from blowing into the vent and to create a mini Venturi Effect, pulling condensation out the oversize vent on the downwind side
• Oversized peak vent that can be easily closed during hard wind, blowing rain, and snow, by folding the wire closed.
• Plenty of room to stand up
• #8 YKK WR Zipper
• Side walls shed snow well
• Main seams are triple rolled, stitched, and flat felled (an MLD Exclusive.)
• Interior Apex hang loop
• Apex/Peak reinforced with DX 210D RipStop
• 2 Doors: Both door side roll open and tie back
• A total of 16 tie-outs!
• 8 ground level perimeter tie-outs with LineLocks for easy adjustment: LineLocks make cold weather and winter use (buried snow anchors) MUCH easier. LineLocks can be removed to save about 1.0 oz
• Extra center side panel tie-outs on Rear and Sides for high winds.
• Supplied two trek pole connector strap.
NOTE: We do not offer pole extenders with the SuperMid as it is too large and using a long pole extender would over stress your trekking pole tip. Use the included Pole Connector Strap or purchase a MLD Carbon Fiber Pyramid Pole.
INCLUDES
• Silnylon Stuff Sack
• 40′ MLD Pro Guyline
• 1.5 oz Tube McNett Silnet Seam Sealer
• Pole Connector Strap
DIMENSIONS:
LENGTH: 110 in | 280 cm
WIDTH: 110 in | 280 cm
HEIGHT: 69 in | 175 cm (Varies with pitch height)
SQ FOOTAGE: 70 + sq ft | 6.5 sq m
MATERIAL: Pro SilNylon
WEIGHT: 26 oz | 740 gm
COLOR: Gray, Orange Citrus
MATERIAL: .75 DCF (Dyneema® Composite Fabric A.K.A. Cuben Fiber)
WEIGHT: 19 oz | 540 gm
COLOR: Green
MLD PRO SILNYLON SEAM SEALING
COST: $75
WEIGHT: 1.0 oz | 28 gm
The SilNylon version of this shelter requires seam sealing, which is why we include seam sealer with all our SilNylon shelters. You can seam seal this shelter yourself in about 30 minutes with the supplied seam sealer OR as an extra service we can do it for you! Watch a how to video HERE.
We use a diluted 100% Silicone Sealer on the exterior stitching above the lower hem. Factory seam sealing can add about 1 week to the order process. Seam sealing adds about 1 oz | 30 gm +/- depending on the shelter size.
Factory sealed shelters are returnable under the regular return policy, where as DYI seam sealing is not.
We STRONGLY suggest you pitch the shelter and test before a trip. Set up before a good rain or spray with a garden hose nozzle arching up in the air and down on the shelter simulating rain for at least 15min. Touch up or resealing may be needed eventually.
NOTE: DCF shelters do not need seam sealing.
INNERNET OR FLOOR
INNERNET(S): Add a pyramid shaped InnerNet to this shelter to create an ultra-light, double walled tent that is modular and strong in wind, rain, and snow. An InnerNet comes with your choice of DCF (Dyneema® Composite Fabric A.K.A. Cuben Fiber) or Pro 20d SilNylon 5 in | 12.7 cm tall bathtub floor with corner struts, Nanoseeum net walls, and #3 YKK zippered full arch single door. MORE INFO…
DIMENSIONS: 90″ L x 90″ W x 54″ H | 228 L x 228 W x 137 H *
SILNYLON INNERNET WEIGHT: 24 oz | 680 gm
DCF INNERNET WEIGHT: 18 oz | 510 gm
* Palace for Two – Great for Three – Four Gets Very Friendly!
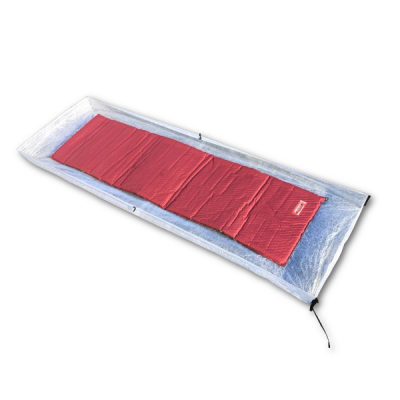
FLOORS: Keep you, and your gear, cleaner and dryer in camp with a waterproof pyramid shelter floor! Your choice of SilNylon or DCF (Dyneema® Composite Fabric A.K.A. Cuben Fiber) bathtub floor with 5 in | 10 cm walls and corner struts keep the floor upright and tight. MORE INFO…
DIMENSIONS: 90″ L x 90″ W x 5″ H | 228 L x 228 W x 13 H
SILNYLON FLOOR WEIGHT: 12 oz |340 gm
DCF FLOOR WEIGHT: 9 oz | 255 gm
CF POLE
COST: $52
WEIGHT: 4.4 oz | 125 gm
LENGTH: 69 in | 175.26 cm
STYLE: 4-Section
FOLDED LENGTH: 20 in | 51 cm
Don’t hike with trekking poles? No worries, get an UL Carbon Fiber Pole in exactly the right length for this Mid. Our Pyramid Tent Poles are made from 0.5″ | 13 mm unidirectional cello carbon wrapped carbon fiber tube, with fabric weave carbon fiber ferrules – it’s a mouthful to say, but it means they’re super bomber and light! MORE INFO…
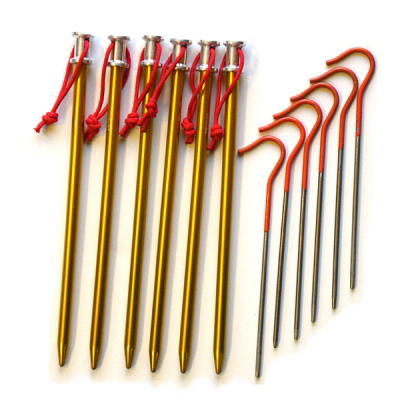
STAKES
COST: $28
Add EIGHT Easton Aluminium Stakes to your purchase.
MLD 2.7 MM PRO REFLECTO GUYLINE
COST: $6
WEIGHT: 2.9 oz | 82 gm
This product includes 40′ of our regular, non-reflective Pro Guyline in your choice of Yellow or OD Green. You can upgrade this to 40′ of 2.7 MM Reflecto Pro Guyline which has properly spaced reflective markers that are bright enough to see, without making your shelter look like that obnoxious house on your block with the out-of-control Christmas lights.
ZIP CARE: ZIPPER LUBE & CLEANER
COST: $10
We HIGHLY recommend Zip Care™ Liquid Zipper Cleaner & Lubricant be purchased with all our zippered gear.
• ONLY zip the zipper up OR down when the bottom buckle is fastened to relieve stress on the zipper. Clean and Lube the Zipper as Needed.
• Most of the time you will pitch it a few inches off the ground for ventilation.
• In high winds, the use of the side panel tie-outs is highly recommended. ALWAYS use a short bungee loop on side panel tie-outs and do not over tighten the side pulls or they will get 75%+ of the load on that one mid panel tie-outs- you want the load distributed over all the tie-outs with the main force directed to the corner main seam tie-outs.
• Use the included Pole Connector Strap, or a piece of guyline, to connect two trekking poles together.
Each of our SilPoly and SilNylon shelters comes with one tube of McNett Sil-Net Seam Sealer. It is STRONGLY recommended you use this supplied seam sealer to seal and strengthen the seams of your shelter.**DCF (Dyneema® Composite Fabric A.K.A. Cuben Fiber) Shelters do not need seam sealed.**
INSTRUCTIONS
1. Pitch and inspect your shelter for any issues. Once it is seam sealed, it is non-returnable except for significant defects.
2. Use the supplied SilNet Sealer and ONLY the SilNet Sealer. (If you want to dilute it or use some other silicone sealant it should work OK and is common (research this yourself online) but, you are on your own- results may vary and are not covered by warranty! If you go this route, it is assumed you know 100% what you are doing and have done it before!!!)
3. Pitch the shelter tightly. Temperatures should be above 60 F and humidity below 80%. You may do this indoors. You may also do one seam at a time indoors if the seam is stretched slightly. Pinning one seam from each end on the floor between two heavy objects works OK.
4. We use the SilNet straight from the tube. Do not make a big hole in the sealer tube – start small so that you can control flow. Multiple small application is a lot better than one big smear.
5. Main Seams: Place a small bead on the seam along the stitching. Work on a 3’- 4’ section at a time. Use a finger to press the sealer into the stitching and the small valley at the edge of the seam where it is rolled under.
ALLOW AT LEAST 24 HOURS TO FULLY DRY.
NOTE: You only need to seal the OUTSIDE of the shelter. You do not need to seal the bottom perimeter roller edge stitching. It is OK to add a small bead on the leading edge of the triangle tie-outs reinforcement stitching, but it is not required.
SPECIAL AREAS: Add a little sealer to any tie-out stitching on the middle of a panel (Mids, Cricket, and SuperTarps). Seal the zipper storm flap stitching and tie-outs on the Mids. Seal the stitching and apex tie-outs areas on the Mids, Crickets, and TrailStars.
IMPORTANT: Do no go back and forth over the wet seam too much – after a minute or three it will get gummy and look bad; it is better to wait for 8 hrs and then add some over any area you missed.
Watch a how to video HERE.
A four-sided pyramid tent is one of the easiest shelters to set up! After a few test pitches, most users can set it in in under 2 min on a normal day, and under 1 min when properly motivated!
PREPARATION:
Cut four 18 in | 46 cm guylines. Tie a 2 in | 5 cm stake loop on one end. Thread the free end of the guyline into the corner LineLocks on the shelter, then up through the rear LineLock slot/hole, over the bar and down through the front LineLock slot/hole. Tie an overhand knot with a 1 in | 2.5 cm tail to prevent the line from pulling out of the LineLock.
FIRST SET UP:
1. Adjust the corner guylines to be short – no more than 2 in | 5 cm of slack from the LineLock.
2: Stake out the rear corners to the ground. The rear wall baseline between the corners should be medium tight, with no slack.
3: Stake out the front corners. The side baseline of the shelter should be tight. Watch the angle formed by the rear and side walls of the shelter at the rear corners and position the front corners so that the rear corners form 90-degree angles. The goal is to have a perfectly square/rectangle floor base. As viewed from overhead the corners and corner guylines form a perfect X shape right out to the stakes.
4: Unzip the front door leaving the bottom buckle snapped.
5: Reach or step in and insert the center pole – adjust it’s height to make the shelter tight.
6: Now you can cut and add any other mid-panel or mid-baseline guylines as needed. The lengths needed will be obvious.
NOTE: Use a small bungee loop on any center panel tie-outs to limit wind force on that tie-outs. DO NOT stake out a center side panel tie-outs too much – it should only move the wall a couple of inches out at most! DO NOT pull it so far it changes the shape of the mid-wall.
That’s It!!! The shelter should be tight and square. You can slightly tighten each corner LineLock if needed.
Almost all setup problems occur when the shelter floor is not square, with all corner angles as close to 90-degrees as possible, or slack is left in the corner guylines.
NOTE: See the setup info for attaching the InnerNets on the InnerNet product page.
Your first setup is a good time to seam seal your shelter IF you have purchased a SilNylon version and did not have it factory seam sealed. Use the SilNet supplied to seal the main seams, center panels tie-outs, door zipper stitching, and the apex stitching. Use only a SMALL amount and do not go back over an area after 5 min. You can use your finger to push the sealer into the seams. If you miss a spot, wait until it is dry and then re-coat as necessary. See ‘Seam Sealing’ tab for instructions.
DOWNLOAD AS PDF


Albert –
We get hurricanes here in September; but I don’t have many chances to go camping, and so camped out in the Duomid, in the mountains, in a hurricane. I didn’t use tent stakes as much as tied the cords to small trees. My buddy informed me that I snored through the storm, most of the night. The tarp didn’t budge.
Sam Hooper –
I’ve had my Supermid for 10 years, and it’s still my go-to shelter. After all these years and >200 nights under the tarp, the zipper pull started to give out, so I sent it in to MLD for repairs. I got it back in a little over a week, free of charge. Great craftsmanship and customer service!
Patrick Riffie (verified owner) –
I just got off a 100 mile ski traverse in the Chugach, and it was my second use of the Supermid. I’ve been using mids for 20 years, and this is my favorite. I wore out a competitor’s DCF mid in 40 nights of use above treeline, and wanted to return to a silnylon, so I researched the Supermid. It’s very well made, has excellent feature and attention to detail, cost half as much as the competitors DCF, and weighs virtually the same as. I’m also glad to be back to stuffing it for storage instead of folding or rolling the DCF. Overall excellent shelter and I’m very pleased with it. The only thing I’m going to change is the tie backs for the doors; the suppled ones are tiny and hard to use with gloves. Otherwise outstanding!
RCM aka “Ugly” –
I have over 120 nights now in what has come to be known as the Tangerine Tipi. Wind, snow, rain, hail, sun, sand… trips in the Cascades, Tetons, Winds, Uintas, Rockies, plenty of nights in the desert, and the Tangerine Tipi has handled them all.The Supermid is simple to setup, whether using stakes, or tied to rocks, or freezing deadmen in the snow, I get a tight pitch right away. I would recommend always weighing down your stakes, using at least the corner guylines. Strong winds exert a lot of force on a mid. When I pitch in the snow with deadmen I use a secondary loop of guyline around the stick for the deadman so that I can cut it to pull it out of the ice the next day if I have to.
The main point of failure will always be the zipper. Keep it clean and if it starts to stick, do not force it. I replaced the pull myself after setting up on a pile of sand. I do not make that mistake again, and now I setup using the inner or putting my groundcloth down first on the ground, right under the zipper. The SuperMid really is that tall! In the summer, pitch it a few inches off the ground, and let the cool air flow. If it gets cold, ratchet it down. When the weather is good, the doors are open all night and I sleep with my head at the door, enjoying the stars.
MLD’s customer service has been great! I had an issue with the inner, sent it in, fixed and sent back to me. I recommend the SuperMid to all of my trekking friends, and anyone who stops by camp to ask about the luxurious Mid that fits two like you are in a palace.