 SectionHiker.com Backpacking Gear Reviews and FAQs
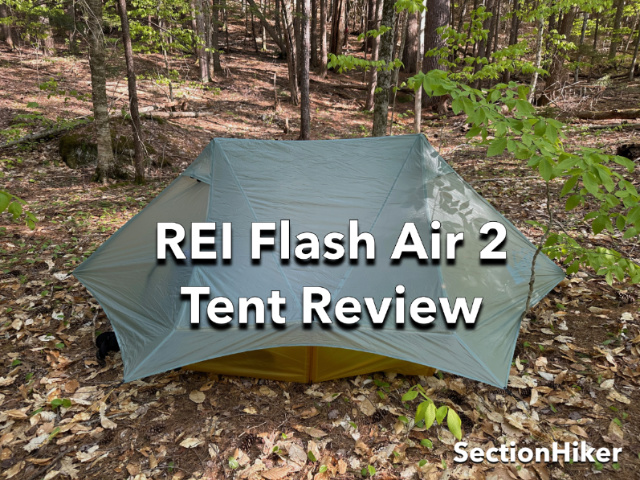
The REI Flash Air 2 Tent is a two-person, single-wall trekking pole bikepacking/ backpacking tent that weighs 2 lbs 4.5 oz on our digital scale. It has two doors and two vestibules and comes with 2 black collapsible poles to pitch the tent with if you don’t use trekking poles. Priced at $329, the Flash Air 2 is very easy to set up with a spacious interior – even for tall people. Being a single-wall tent, the bathtub floor and the rainfly are connected, making it easy to set up dry even if it’s raining. The tent’s ventilation, outfitting with line loc tensioners, reflective guylines, and vestibule space make this an excellent value for an entry-level ultralight backpacking and bikepacking tent.
Specs at a glance
- Size: 2 person
- Type: Single-wall
- Structural: Trekking Pole Tent
- Published Minimum Trail Weight: 2 lbs 6.5 oz
- Actual Minimum Trail Weight: 2 lb 4.7 oz includes 2 required “gold” poles
- 2 Optional Trekking Pole Replacement Poles included (4.5 oz/pair)
- Minimum number of stakes to pitch: 6, recommended 8
- Doors: 2
- Actual Bathtub Floor Dimensions: 86″ x 50/42″ (L x W head/foot) inches
- Vestibule Volume: 28.72 sq ft
- Peak Height: 47 inches
- Seam-taped: Yes
- Fabric: 20D ripstop nylon
- Hydrostatic head: NA
The REI Flash Air 2 is a 2-person trekking pole tent with 2 doors and two vestibules so occupants can have their own entrance/exit and vestibule gear storage area. The tent comes with two sets of two poles: a black set that is inserted into poles sleeves at the top of the vestibules and that can be used to erect the tent if you don’t have trekking poles, and a two-pole gold set that is used on the ends to increase the depth of the bathtub floor and create more room under the rainfly above the head and feet.

Being a single-wall tent, the bathtub floor and the rain fly are sewn together and set up simultaneously. This is very easy to do with the Flash Air 2 because it has a rectangular-ish floor plan, wider at the head end. You simply stake out the corner guylines on a 45-degree angle, insert the poles into the vestibules, and tighten the pitch all around using the line loc tensioners on the tent’s guylines. Since the bathtub floor and rainfly are a single unit, you can set up this tent in the rain and it will stay dry inside.

The tent has 2 large side vestibules that have plenty of room for gear storage that does not interfere with entry and exit. Both vestibule doors have two-way zippers and velcro patches along the length, so you can create a top transom for airflow even when they’re closed. They also have kickstand peak vents that can be opened to help release the warm air and moisture that can accumulate in the ceiling, particularly when the vestibule doors are zippered shut, which can exacerbate internal condensation.
The tent comes with two optional black collapsible tent poles that can be used instead of trekking poles to pitch the tent. These are handy if you’re a bikepacker or you don’t use trekking poles. They’re also handy if you’re a base-camper that does use trekking poles because it means you can set up the tent and then go hiking with your poles without having to take down and set up the tent each time you leave/return. For purposes of packability, the longest segment on the black shock-corded poles is 16″ which will fit in most bike frame bags or panniers, although they might not fit horizontally in smaller ultralight backpacks if that’s how you prefer to pack your tent poles.

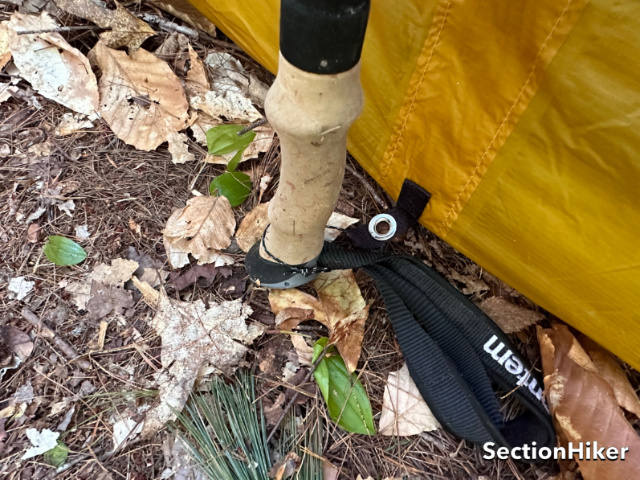
If you use trekking poles to set up the tent, the tips should be oriented up and slot into reinforced sleeves in the peaks of the vestibules. The same is true if you use the black pole set. The handle end of the trekking poles is held in place close to the side of the bathtub floor with a loop of cord. If you use the black poles, the base of the poles slots into a side grommet so they won’t slip out at night.
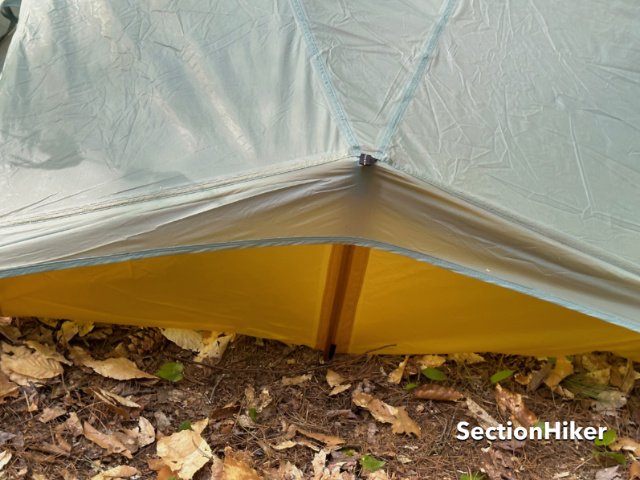
The tent also comes with two short (16 and 1/4″) gold-colored aluminum poles. These slot into reinforced sleeves and grommets at the head end and foot end of the tent. They help create more space above the head and the feet inside the tent and help to keep the walls of the bathtub vertical. They serve the same function as the pitchlocs used by the tent manufacturer Tarptent. Once inserted, these gold poles are VERY difficult to remove and I suggest you leave them in the tent permanently rather than struggle with them (I still can’t get one of them out). They don’t affect packability that much. They only weigh 0.6 oz each and aren’t really worth replacing with anything lighter.
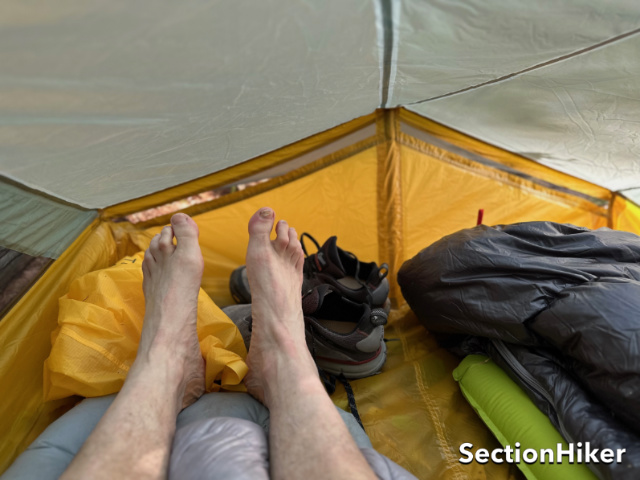
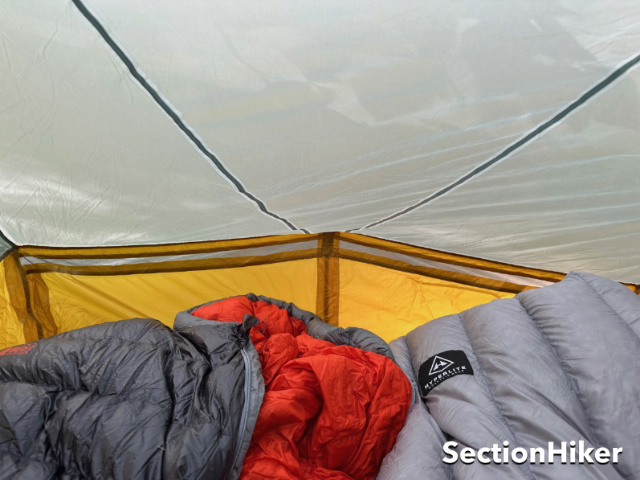
The interior of the tent is very spacious inside and is wide enough to use 2 x 25″ wide pads, as long as they have a tapered mummy shape. The tent is also 86″ long (we always measure the inside of the tent), providing plenty of extra space for taller campers or to store clothing and extra gear inside.
In terms of ventilation, the sidewalls of the tent are solid mesh and there is a strip of mesh located between the ceiling and the side walls at the head and foot ends of the tent. While the latter does provide some ventilation benefit, the real purpose of this mesh is to create some slack between the rainfly and the sidewalls, like a floating floor, that adapts to the terrain if you set up on an unlevel spot. This floating floor feature is a signature feature of the class of single-wall tents called tarptents (not to be confused with the manufacturer named Tarptent), of which the REI Flash Air 2 is a member.

Best Practices
The key to avoiding internal condensation in a single-wall tent is to sleep with the vestibule doors wide open, so there’s only insect mesh between you and the wilderness. To do that, I suggest taking two of the extra guylines included with the tent and tying them to the reinforced loops at the top of the vestibules. This will let you stake out the tent, but roll back both halves of the vestibule, enabling maximum airflow. This is my favorite way to sleep in a tent like this in good weather.


When the vestibules are fully rolled back, there will be some added slack in the big panels above the head and foot ends of the tents. You can eliminate that by adding guy-out lines to the external loop above each of the gold end poles, as shown above.
REI Flash Air 2 Ultralight Tent
Comfort
Ease of Setup
Weather Resistance
Durabilty
Weight
Packed Size
It might also be worth adding a guy-out point to the big ceiling panels since the Flash Air 2 only has guy-out points located along the seams, but that’s a much bigger job than meets the eye and would probably require some sewing and seam-sealing to implement.

Recommendation
The REI Flash Air 2 is an ultralight trekking pole tent with a minimum tent weight of 36.7 oz (on our digital scale) and is made with more conventional materials (20d ripstop nylon) to keep its price reasonable ($399). The interior of the tent is quite large, with plenty of space above the head and toes. The tent sets up fast because the rainfly and bathtub floor are all one piece so you can do it in the rain without getting the interior drenched.
The reason we like the REI Flash Air 2 is that it ticks a lot of boxes for a more traditional pair of backpackers looking to shave some serious weight from their shelter without sacrificing comfort and ease of use, and its wide availability at REI stores will hopefully help to expose a much wider audience to ultralight backpacking. We particularly appreciate that optional tent poles are included (instead of having to buy them separately) to use on trips when you might not bring trekking poles. For folks who have never used non-freestanding or trekking pole-supported shelters before and are curious to try them out, the Flash Air 2 is a good entry point, as the basic setup is simple.
Competition
There really aren’t that many competitive tents to the Flash Air 2, if you only consider single-wall tents, made with more conventional materials, and not more expensive Dyneema DCF:
- The Gossamer Gear “The Two” (23.5 oz) is a spacious single-wall tent with a two-pole design. Made with Sil/PU coated fabric and factory seam-taped, it has less room above the head and foot ends compared to the Flash Air 2 and does not come with any accessory poles (sold separately). It’s also made with 10d fabric which is much more fragile than the 20d ripstop nylon used on the Flash Air 2. $375.
- The Six Moon Designs Lunar Duo Explorer(45 oz) is made with siliconized nylon (silnylon) and is a spacious two-pole, two-vestibule single-wall tent with good ventilation. Unfortunately, it is much heavier and must be seal-sealed before use. $395.
Disclosure: The author owns this product.
SectionHiker is reader-supported. We only make money if you purchase a product through our affiliate links. Help us continue to test and write unsponsored and independent gear reviews, beginner FAQs, and free hiking guides.
Woah, tell us how you really feel! I agree that there’s a culture of gear snobbery in the ultralight world, but I’m not sure where the “so people without a trust fund can afford it” comment came from, since the two competitors that you mentioned are actually slightly cheaper than this tent (although this tent does include the spare poles).
To be clear, I agree that it’s great that REI is making ultralight gear, so people can see it in person from a brand that they know (instead of having to blindly order something online based solely on reviews). I was just surprised by the “trust fund” comment when it’s a very similar price to its nearest competitors.
But it’s not similar in price to DCF tents which are TWICE as expensive, now is it? That’s what I was referring too. And for what. Saving a few ounces and paying twice as much really doesn’t make you a better hiker.
Amen. Philip!
I happen to agree with the author. ultralight backpacking has culturally become a celebration of wealth. The original Ray jardine texts reference low cost items from the hardware store and a shift in methodology. Even now we’re too eager to chase $500 backpacks, and $1,000 sleeping bags in the name of saving a few ounces instead of shifting our methods. The sentiment holds up for me.
Hi Tom,
When I read Phil’s review, I took his comment about “trust fund” to refer to the DCF tents, not the two competitors at a slightly lower price. I did not read it to suggest it was a statement about the two competing tents.
I understand the importance of lighter weight backpacking, and appreciate Phil pointing out the strengths of the Flash Air 2 compared to the two competitors that goes beyond the price. I feel the ultralight community is trying to make up for building skills and woods wisdom by spending more on equipment. Thank you Phil for an objective and informative review. I’m going to buy a Flash and sensibly lighten my load. Thank you.
You can often get 20 percent off one rei products during their twice yearly sales…knocks about a hundred bucks off…and yes you do need to be a member
Thank you Peter for your suggestion on how to save some bucks.
I have the first generation Flash Air 2. That tent is going out on a 5-day trip to Isle Royale N.P. next week.
Thanks for this review, it allowed me to see what changes REI has made with this new generation. Not sure if it is worth the extra $100 over what I paid for the first-gen version, however.
The biggest difference is that that top brow pole has been completely eliminated.
I have the first version of The Flash here too and the only thing I dislike about it is those two brow poles they are awkward and kind of ridiculous other than that the tent has been great
They’ve been removed in this version/
don’t waste your money!! if you live or camp in the south, this tent will not keep you dry. opt instead for something like a Durston x mid. double wall, easy and fast pitching, and oh yea, it costs less. no-brainer in my personal opinion.
I think he’s advocating the use of double wall tents instead of this single wall one.
You seem to have reevaluated your position on struts that must be packed with the tent. Back in your Tarptent Aeon Li review, you said, “I have a difficult time coping with this because my packing regime is decidedly horizontal in nature. Personally, I’m not willing to stop using my favorite backpack to use this tent.” Now however you are seem very happy with a tent that has longer struts. What changed? Is it the fact that this is a more affordable 2 person tent?
I actually haven’t re-evaluated my position at all and I note in this review that the pole length can be an issue for narrow backpacks, particularly smaller volume ultralight backpacks, if you prefer to pack your tent horizontally.
I wrote “although they might not fit horizontally in smaller ultralight backpacks if that’s how you prefer to pack your tent poles.”
Since I wrote the original review (of the Aeon Li) and complained about the pitchloc length, Tarptent has modified them so that they can be removed and collapsed in the new Dipole tent. I believe it was in response to my original critique and makes for a better product.
How is Goliath not ripping off the Gossamer Gear Two? At first glance I seriously thought this was an updated GG2. The industry is cannibalizing the cottage industry. Not a fan.
There are several tents already on the market that look exactly like “The Two”. It wasn’t a very original design to begin with. This tent is actually substantially different from the Two and in some ways better.
Fyi…not sure its fair to call Rei goliath…they are a member owned co-op…if you go back to their origins, they are very much sort of the first cottage company….tens of thousands started backpacking with some degree of comfort using rei designed products like the cruiser backpack
the company was know for hiker/climber designed gear at a low price…I am proud to still be a member who remembers the original Seattle store and its funky multi level warehouse mojo…not to mention the overnight lines every spring sale
I’m not sure how the market ended up with so many 2P tents that don’t fit 2 wide rectangular pads. Is it a focus on weight? Of the possible competitors that were listed only 1, the Lunar Duo Explorer, is actually 50″+ wide both at the head end and foot end. For the Flash Air 2 (and most other 2P tents) the two occupants are locked into using wide mummy-shaped pads. I own an older LL Bean Microlight 2P tent and it has the same foot print issue and it drives me crazy! Compounding the problem is the actual height at the foot end. I end up sleeping in the middle in colder months so that my warmer sleeping bag isn’t brushing up against the inner wall – that wouldn’t be possible with 2 occupants.
It’s the focus on weight.
Hi Phillip,
Looks like a big improvement over version 1.
There are some great sales on at the moment–I see Slingfin has their updated, 2Lite, double wall tent of similar weight and proportions to this one for a similar price at the moment. It is my go to lightweight summer tent.
Perhaps, a review on that updated tent too?
Thanks for a great site.
Chris
so many tents, so little time.
Philip you’re the best and give us the most comprehensive reviews of anyone. I’m glad to see this improved tent from REI, however, as far as this tent is concerned and when compared to the X-Mid 2p Sil-poly, the X-Mid gives you non- stretch, non-water absorbing sil-poly, similar room and weight, packs smaller and is doubled walled for $200 less. To me, the X-Mid is a no-brainer over this tent.
Double wall vs single wall. That’s not exactly a fair fight. :-)
I’ve enjoyed my REI Flash Air 2 gen 1 for the last couple of years. Spent 10 nights in northern NM at Philmont with this tent. I love the weight! Also been on a number of outings from very humid to very wet and it performed quite well. I totally appreciate Philip’s work to teach about moisture management.
The one thing I’ve found challenging is the size of the footprint – this tent needs plenty of room – but i’ve learned over the years to sleep on hills and rocks :) Overall I like the tent and I’m excited to see they changed the poles and added a bit of color to the tub.
It’s on sale right now. 30% off, so $280. Sales ends 5/29. You have to be a “member” and I think it’s around $30 to be a member but it’s a lifetime membership.
And now in July 2023, REI site says of this tent, “HURRY! This item is discontinued.” Price is $278.93. Wonder what happened that they discontinued it so soon after introduction? Were sales that slow?
I suspect they are just running out of inventory.
Does the tent floor hold up to wear or do you recommend bringing a footprint along?
Depends on the surface. If you sleep on forest duff, it’s fine as is. If on rock dust, I’d recommend using a sheet of plastic underneath.
Thank you!
I have the 1st Gen flash air 2 and have loved it. I was curious what the new design had changed. I see that the flat roof panels of the 1st Gen has changed with a seam down the middle leading to the end stuts thus making the roof pitched to shed water and presumably wind. it’s interesting that they removed the brow poles yet the weight increased. Any thoughts on what is increasing the weight?
What’s the best way to fold this tent up? Or any trekking pole tent matter of fact? Either dry or after it’s been rained on??? any help will be greatly appreciated
For this tent and any other made with nylon or polyester, it doesn’t matter all that much. I usually fold mine into rectangles, roll it and then just stuff it in a stuff sack. If it’s wet, it helps to put into a waterproof bag and dry it as soon as possible. If it’s made with Dyneema DCF, then you want to roll it. That prevents creases from forming in the material – which isn’t a fabric.