Shaped tarps get boring after a time. Most are pre-cut with a specific shape in mind and they can only be pitched that way.
If you are bored of the A-frame and pyramid pitches, then gather round and let me tell you about flat tarps. They can be pitched in many different shapes to protect you from the wind, compensate for missing gear, enhance your view, and give you something to amuse yourself with in camp. Imagine being able to sleep under a different pitch every night for 3 weeks! You can even save yourself some money by buying a less expensive, old-school tarp.
There’s a catch. You’re going to carry some extra guy lines and stakes because you never know how many you’ll need beforehand. That’s the tradeoff between specialization and generalization. You won’t be bored though.
How to Pitch Macpherson’s Tarp Shapes
To get started, download a copy of David Macpherson’s free PDF that describes different tarp pitches. Be forewarned. While Macpherson lists many tarp shapes, some of them are mathematical curiosities, not practical tarp pitches. You need to try them at home before you count on them in the field.
Macpherson’s descriptions can also be very hard to implement on an actual tarp, because tarps are floppy and don’t have well-behaved fold lines like construction paper. To figure out the best way to pitch a given shape, make a model of it using paper first, and then simplify the steps required to pitch it.
I’d also recommend that you get a square tarp with straight edges to start practicing with. An 8.5 x 8.5 foot or 9 x 9 foot sized tarp is good. Make sure that it has symmetrical tie-outs on all 4 corners and half way between the corners on the sides. A center tie-out on the ridgeline is also very helpful. That makes a minimum of 9 ties outs total.
Some recommended square tarps:
Finally, get 12 tent stakes, preferably with shepards’ hooks and easy to untie guy line, like 550 paracord. Unlike a shaped tarp, you will guy out each shape from scratch, and not keep any guy lines on the tarp permanently. I use 2 knots for all of my pitches: a double figure eight on the side of the tarp, and an adjustable taut line hitch at the stake.
Let’s look at some cool tarp shapes now. There are many more.
The Adirondack Wind Shed
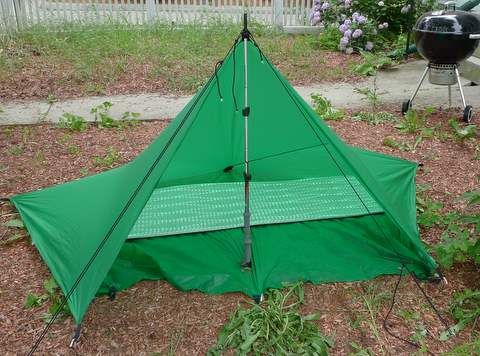
The Adirondack Wind Shelter provides fairly good protection from wind and rain with it’s side walls and awning. It also has plenty of room inside to stretch out under and for gear storage. Blowing wind can depress the back of the tarp towards the occupant, but it is easy to prop some gear against the rear wall to prevent condensation transfer to a sleeper. I used this pitch more than any other in decent weather. It’s easy to set up.
Kennel

The interior space in the kennel is tight with an 8 x 8 foot tarp, particularly at the ends of the shelter. Despite this, the interior ventilation is fairly good. This pitch can be used on wet ground because the tarp is used as a ground cloth. Although the Kennel provides rear and side wall protection, it provides limited protection from blowing rain unless positioned perfectly.
Half Tetra Wedge Cover

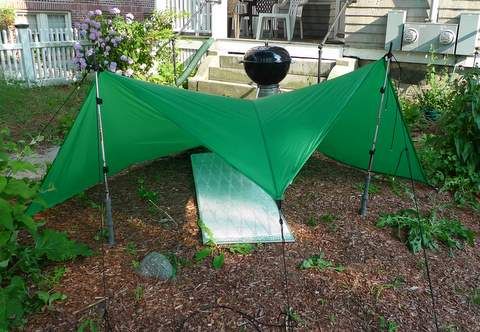
The Half Tetra is similar to the Adirondack Wind Shed in shape but has a much large gear storage area because the rear area is pulled out to form a large triangle, instead of being folded flat to form an triangular interior ground sheet. This also improves wind performance because the rear of the pitch is shaped like an triangle and not a box. For additional protection, the side wings of the Half Tetra and can be angled closer to the poles, preventing driving rain from entering the large sleeping area.
Bivy Bag

The Bivy Bag Pitch is a little tricky to set up because the tarp serves as a ground cloth as well as a overhead cover. Interior ventilation at the rear is very poor and there is likely to be some condensation transfer where the top of the tarp touches an occupant. Still the bivy bag shape presents a very narrow profile to the wind and may be suitable for blowing rain.
There is a variant of this pitch which has an awning that pulls the apex of the tarp forward above the pole but getting a stable pitch like this may be difficult with a slippery material like silnylon.
Low Tetra

The Low Tetra is a three-sided triangle without a door. It uses one internal pole as a support, but keeping it standing can be difficult without a cup-like beak in the tarp apex. One possible solution would be to use the plastic coffee filter holder to help secure the top of the pole inside the apex.

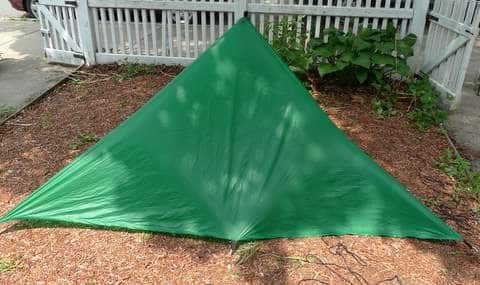
When pitching the Low Tetra, one side of the four sided tarp is collapsed upon itself in the interior of the pyramid. It is possible to reopen this side partially and create a vestibule for getting in and out of the pyramid and for gear storage. Despite this, the interior space of the Low Tetra remains cramped for one person using a 8 x 8 foot tarp.
Conclusion
As you can see from these sample shapes, there are a lot of exciting ways you can pitch with an 8 x 8 square tarp. There about another half-dozen good shapes in Macpherson for square tarps, and then another dozen or so for rectangular tarps. After mastering these, I plan to spend some time digging through history books to find additional pitches and maybe even invent some of my own.
 SectionHiker.com Backpacking Gear Reviews and FAQs
Wow, I thought I knew alot about tarps. I'm truly humbled.
It's an eye opener for me too. I really like the skill aspect of all this. While a pre-shaped tarp takes all the guesswork out of a pitch, it also takes all the skill away. You don't have to decide which is the best pitch for the weather, lineloc tensioner eliminate the need to tie knots, pre-guyed tie outs prevent you from interesting folds or using your tarp as a cover and a groundsheet. Nope, this is not boring at all!
Fantastic info there in the pdf. I have been guilty of using the same couple of tarp set-ups whenever Im out. I've kept meaning to look into alternative pitches but never got around to it. Particularly like the easy idea of practising out some origami techniques first.
I spend a lot of time fiddling with A-frames, but some of these pitches go up even faster. You really only need to learn 3 or 4 more to have lots of variety and it's worth a few hours in the front yard to learn up on them.
The paper models really help. It was very difficult for me to understand how to pitch the low tetra, but playing with the model and simulating the steps made it possible for me to figure out an easy sequence of steps. It's also fun folding them.
There are a lot of good ideas on how to pitch a square tarp on http://www.bushcraftusa.com under the Shelter section.
If you are going to get fancy, I think a 10×10 tarp is a better choice. That allows you add some corners and still have decent coverage overhead.
This inspired me to collect some photos and write up a description of my favorite tarp pitch, The Cave:
https://wunderwood.org/most_casual_observer/2011/0…
While I was at it, I also posted about the A-Frame pitch:
https://wunderwood.org/most_casual_observer/2011/0…
I was looking at the kennel pitch today and pretty much agree with you. Need a bigger tarp for that one. Although there is one thing I want to try…
wow, i love it when people totally geek out on stuff like you have in this post – i mean this as a compliment! your photos are useful –
I downloaded DBM's pdf a couple of weeks ago when was contemplating using a piece of Tyvek as a last minute backup for my somewhat inadequate tent…it was a very distracting endeavor: i spent hours in the backyard with a tape measure, knot book and ropes…ok, guess I just proclaimed my own geek status online
I hadn't thought to make paper mockups!
thanks – i know what i'm doing my next rainy weekend day!
I've been thinking abut making a tyvek tarp myself. If only to prove that it can be done, and so I can tell people how much it costs. The models are a must have – and they're fun to make.
I found some cheap silnylon on eBay – time to learn how to use a sewing machine!
Hi, thanks for your super site – great stuff. I need a favour(!) could you upload (or email me direct) additional picture/s / instructions of the low tetra with vestibule – I am stressing out trying to config the vestibule as per the online pic. I am able to form / set up the pyramid shape and I have the 'spare' available to form the vestibule but, try as I might, I can't match your (opened up) layout! I am using a 10 x 10 tarp with 5 loops on each side. Looking forward to the vids!!
Best wishes
Tyke
(England)
The vestibule was really a whimsical attempt to make the low tetra work with an 8 x 8 sized tarp. Having the right tie-outs is really important, as I'm sure you've found out. I just sent you a few more photos of the vestibule. All I really did was pull the two extra half sides out (from the hidden 4th side) and guy them out.
This is a funny shelter with an 8 x 8 because you can't really get in our out, with the regular low tetra!
Fascinating. Do you have any thoughts on the suitability for seasons? For example, would you try this in snow or below freezing temperatures?
I think when I get my 8×8 (or 10×10) figured out, I might draw some folding lines in various Sharpie colors to help when I'm out in the field. Red lines for Kennel, Blue lines for Half Tetra Wedge Cover, etc.
I think most of these pitches are good for 3 season use although you need to pitch them in the right direction to prevent getting wet in rain and some are more tolerant of wind than others. None of that really bothers me of course, because I like the decision making process involved in picking the right pitch. The skill element fascinates me.
For winter and snow use, wind is a factor, but more importantly will be the number of snow anchors you need since these can take some time to harden. Some of the pitches require a fair number of guy out points – although now you've got me thinking about ways in which you can augment some of these structures by simply building a snow wall in front of the opening.
Oh – and I'd skip making lines on your tarp. Just practice the pitches and you'll remember how to set them up, or bring the paper models as a reference.
I just stumbled upon this old post as I was looking at square, flat tarps online. I love the versatility. Do you find that the 8’x8′ tarp provides enough length to keep your head or feet dry in stormy conditions? I am under 6′ tall and would be using the tarp as a solo shelter.
I have considered going to a larger size, but silnylon begins to get fairly heavy (I would rather not pay a premium for cuben fiber). Any thoughts?
I am toying with going to a 9×9 for slightly better weather coverage. While size matters, you also need to figure out where you want the timeouts. On a square tarp, I find that it really helps to have symmetric timeouts, but many manufacturers don’t provide them.
I’m not tempted by cuben. It’s just not worth the money. I am tempted by tyvek though. Terra rosa in Australia makes a nice tyvek tarp, but I will probably go with plain old silnylon or one of the newer ripstops fabrics available in 20 denier that give cuben a run for its money in terms of improved durability with low cost and weight.
If you can wait a few months, I’ve had a manufacturer offer to make a tarp series on my spec…I have some ideas about square tarp pitch flexibility and tie outs I want to test out.
Square or rectangular tarps are the way to go in terms of versatility. Cat tarps just don’t give you the flexibility you need when you are off trail and wilderness camping.
If you want tie-outs, I highly recommend a Tundra Tarp from Cooke Custom Sewing (https://www.cookecustomsewing.com/tundratarp.htm). The quad-loop thing is especially cool, because it stabilizes the top of a paddle or trekking pole used as a center pole.
They do custom sizes and colors.
That is a cool spec diagram they have. Lots of tie-outs, but it also needs panels pullouts. How ever, I am not getting the point of the quad loop. What shape are they talking about?
If you want more tie-outs, ask, because their name is “custom sewing”.
The quad loop is webbing overlapped to proved four opposed loops. One cord is run through all of them to cinch them up around something.
Their explanation is on page 7: https://www.cookecustomsewing.com/images/tundratarpsetup.pdf
This customer has a couple of good photos of the quad loop, scroll down:
https://www.bladeforums.com/forums/showthread.php/638971-My-New-Cooke-Tundra-Tarp
That customer photo was very helpful. That’s what I thought it was for but I never carry a paddle, yet at least! Thx!
It works fine with a trekking pole, too.
I came really close to buying one of the Cooke Custom Sewing tarps a couple years ago and then bought a used silnylon tarp from some guy who hikes the Whites and blogs about it…
It’s not square (it’s 8 x 10) but I’ve really enjoyed its flexibility. Last month, it made a visit with my wife and me to its old stomping grounds while Philip was down here in Texas.
Thanks for the feedback. I’ve thought about 9×9 as well and even about splitting the difference at 8.5×8.5. I’ve got a bivy I could use that would add some extra protection. I would really like to keep my tarp under the 1 lb mark, which seems tough to do with silnylon once you add cordage and stakes.
I do have a tie-out configuration in mind. It may be a little overkill (lots of tieouts and panel pulls), but I like having options.
A tarp that is not pitched nailed tight to the ground and completely closed in is useless for cold windy weather. Camping without a chimney in winter is to rough for me. chimpac
Great reviews. Love it. Looking for solutions in New Zealand where it is always windy- and gusty, swirling wind- and where it is wet, and where insects are often an issue. Where the insects are not an issue the big square tarp works pretty well with a SOL escape bivy. I have been in a decent storm, with strong gusty winds and heavy rain at the tree line (1400m) and it’s been fine.
You’ve got it. I’ve been doing this since the 80s, in all kinds of weather. Nothing more important to me than a tarp and a roll of cord. Everything else is secondary. No matter the conditions, no matter the situation, if I have a tarp I will survive.
The key to tarp camping is knowing your ropes and knots. I haven’t carried stakes in years, and if I need one I’ll whittle one up, but I can’t remember the last time I did so. Many years. There is always something to tie off to if you know your knots.
Great write-up. I enjoyed it. I’m in New England, too. Probably passed you on the trail at some point. :)
Probably!
Okay… this is cool… and something I’m going to play around with once the snow is gone from my yard! I have a 1-lb., sil/nylon, super lightweight tarp that I use for canoeing and backpacking…. and have always felt I could make better protective covers. Excellent ideas!
Come March in Canada I start dreaming of my next camping adventure! Love the Kennel Tarp pitch … Was looking for a tarp set up to butt up against the entrance to my one person tent. My dog can cozy up under the tarp and won’t take up all my space! Thanks!
If you want a four season shelter there is only one way to pitch a tarp. I commented before about using a chimney in a tarp shelter so all sides of a tarp shelter can be pegged tight to the ground . Only 4 corner pegs are needed and tarp support of 2or 4 vertical poles (sticks) and chimney. If the corner pegs hold it will stand in any wind and the 4 four sides can be raised for camping in the summer heat
Take a look at tarp pitches on p.13 of “LIGHTEN UP!” by Don Ladigin with illustrations by Mile Clelland.
My favorite is the “Bombshelter” pitched between 2 trees. Yes, it’s a 10′ x 10″ tarp but in silpoly or silnylon it should still be fairly light.