 SectionHiker.com Backpacking Gear Reviews and FAQs
The Durston Gear Kakwa 40 Backpack is an ultralight, internal frame pack that weighs well under 2 pounds with a total volume of 55L including 40 liters in its main compartment plus 15 liters of additional external storage. It provides excellent weight transfer to the hips with moderate loads and is one of the least expensive packs on the market made with abrasion-resistant Challenge Ultra 200 fabric. SectionHiker was very impressed with Durston’s X-Mid 1P (v2) and we think there are a lot of users who will find the Kakwa to be an excellent pack for their needs. We also suggest a couple of minor improvements to broaden the pack’s applicability.
Specs at a Glance
These specs are for a size medium (16.5”-19.5”/ 42-50 cm torso) pack, which we tested. The Kakwa 40 also comes in small (14.5″–17.5″ / 37–45 cm torso) and large (19″–22″/ 46–55 cm torso) sizes.
- Weight (manufacturer): 27.8 ounces (1.75 pounds)/790 grams
- Weight (tested) 26.88 ounces (1.68 pounds)/762 grams
- Gender: Unisex, with S-shaped shoulder straps
- Pockets: 7: 2 asymmetrical side pockets (1 with extra “QuickPocket” zip pocket), 2 hipbelt pockets, 2 shoulder strap pockets, and a front mesh pocket.
- Color: Gray
- Type: Internal Frame (8 mm hollow aluminum inverted U-shaped tubing)
- Hydration compatible: Yes
- Seam-taped: No
- Bear Canister Compatibility: BV500 fits vertically, or strapped to the top
- Internal Volume: 41L (2502 cubic inches)
- External Volume: 15L (915 cubic inches)
- Top circumference: 36”/91 cm
- Bottom circumference: 31”/78 cm
- Unrolled height (M): 33”/84 cm
- Materials: 3.5 oz/ sq. yd. 200D Challenge Ultra (Main Body+Side and Hipbelt Pockets), Stretch fine-pore mesh (Shoulder Strap Pockets), Heavy-duty polyester knit low-stretch mesh (Front Pocket), YKK AquaGuard Zippers
- Maximum Recommended Load (manufacturer): 45 lbs
- For full specs, see the product page at Kaviso.com (the distributor)
Backpack Storage and Organization
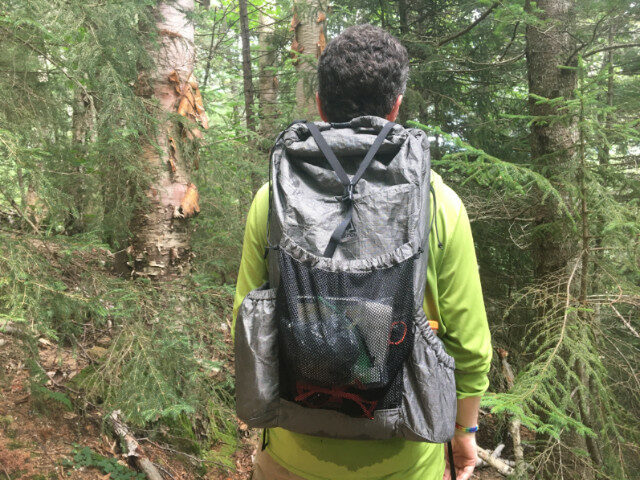
The Kakwa 40 is a clean-looking pack with a number of classic ultralight pack features as well as some distinctive design elements. Developed by Durston Gear owner Dan Durston, a backpacker, and adventurer with an impressive hiking resume, a lot of consideration has gone into features that allow you to access the essentials you need during the day without having to stop and remove the pack.

The main pack bag is a single compartment and holds approximately 40 liters, depending on size (small is 38 liters, medium is 41 liters, large is 44 liters). While many large retail backpack manufacturers include all the closed storage in their volume calculations, it is more common in the cottage industry (and is the case with Durston’s Kakwa) to name the pack based on the storage capacity of the main bag only. The main bag closes with quick-release buckles that attach to themselves, in the style of a dry bag. There are no additional buckles and webbing on the sides to which you can connect the roll top.
On the outside of the pack, there are asymmetrical side pockets, zippered hipbelt pockets, a pleated mesh pocket on the pack’s front, and two stretchy shoulder strap pockets. According to the manufacturer, the Kakwa 40 has an additional 15 liters of storage between these external pockets.
Let’s take a closer look at each of these features.

Shoulder strap pockets
I really like the shoulder pockets on the Kakwa 40. They are made of a stretchy, fine-pored Lycra-like mesh with a cordlock and shock cord closure on top. They are a very convenient and accessible way to carry bear spray, phone/camera, satellite messenger, sunglasses, or 16-20 oz water bottles (one-liter bottles are too tall or wide for these pockets). The only problem is deciding which two of these things you want to carry here! The top elastic cinches closed with one hand for security while you’re scrambling. Well done.
Side pockets
The side pockets are asymmetrical, with the right-hand side pocket cut at a diagonal to facilitate easy water bottle access, and the left-hand pocket taller and cut straight across. Both pockets are 3-dimensional, with a half-circle of fabric sewn as the bottom panel of the pocket. I prefer 3-D pockets like these to pleated pockets, because I prioritize ease of access and more capacity over the ability to fold flat when not in use.

Both side pockets and the front mesh pocket have non-adjustable and non-replaceable elastic that is captured inside a channel of Ultra fabric. Dan Durston says that capturing the elastic in this way prevents damage and wear, allowing for a longer lifespan than pockets with elastic binding. My experience agrees with this: although my favorite pockets have user-replaceable cord, I’ve seen elastic-bound pockets go limp in a couple of years, while my old Lowe Alpine pack with captured elastic pockets still had stretch after more than a decade.
The capturing of the elastic means that pocket tension is permanently set; the user can’t tighten or loosen the pockets depending on their contents.
Angled pocket

I had no problem removing and replacing a single water bottle from this pocket– even though it is on my non-dominant hand side. However, when I carried two bottles in this pocket, the fit was tight and I had to ask for help from my hiking partner to access and replace a bottle.
Tall pocket
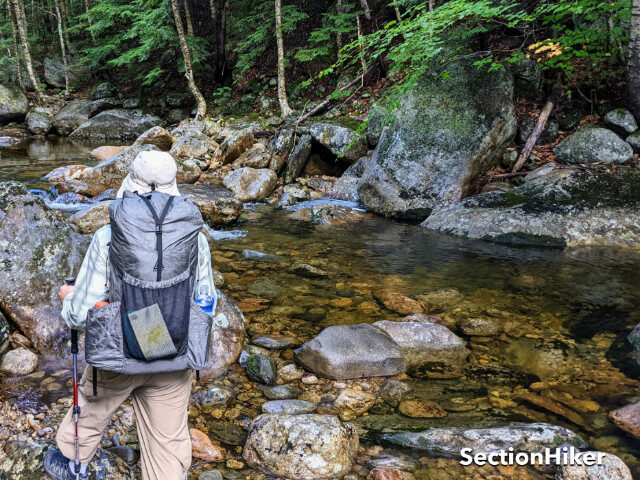
The taller left-hand pocket is ideal for larger items like a tent, Tenkara rod, tent poles, or a collapsible water carrier like a Platypus that would flop over in a lower-cut pocket. This pocket is uniquely constructed with a double layer and a vertical zip that is accessible while wearing the pack–called the QuickPocket. The inner and outer pocket play a zero-sum game with space, so the less you put in the inner pocket, the more volume is available for the QuickPocket, and vice versa. I found that, when I had a water bottle in the inner pocket, my crushable boonie-style hat could fit in the QuickPocket, but my rigid-brimmed cap with a sun cape could not.

The best use I found for this pocket was stashing and accessing a map on the go. I could slide it in horizontally and tuck the top of the map behind the little strip of fabric on the side of the zipper closest to my back, and then zip it closed for security, all while wearing the pack. This was much more convenient than using a map holder clipped to my shoulder straps, or keeping the map in the front mesh pocket and having to take the pack off or ask a buddy to get it every time I wanted to check it.
While many packs raise their side pockets up an inch or two from the bottom of the pack to protect them from abrasion, the pockets on the Kakwa are flush with the bottom of the pack and are made from the same durable material as the bottom of the pack–Challenge Ultra 200. This design feature also helps with the accessibility of your water bottle in the diagonal-cut pocket, because it allows the opening to be lower.
I was surprised to see that there are no drain holes on the side pockets. More on this later.
Mesh front pocket
The mesh pocket on the front is a heavy-duty polyester low-stretch mesh that is pleated at the bottom. This means it can expand to hold a fuel canister, water filter, wet tarp, or rain jacket but is not droopy when empty. As described above, the top elastic for the pocket is captured in a sleeve of Ultra fabric, so it’s protected but its tension cannot be adjusted.
Hip belt pockets
The hipbelt pockets are 6” long x 3” tall x 1.5”-2” wide (2” at the base tapering up to 1.5” at the zipper) and close with a YKK AquaGuard water-resistant zipper running over the top. The zippers open from front to back (i.e. you open them by pulling the zip towards you) and can be easily opened and closed with one hand. I really appreciate this easy access because I’ve used a number of hipbelt pockets on other packs that require two hands to open. I mostly use these pockets for a headlamp, head-net, and snacks.

Hydration port
There is a hydration port on the right side of the pack, but no hanging hardware (e.g. sleeve, webbing loops, toggles, or mitten hooks) inside. I’m assuming the design thinking behind this is to pack all your gear in a waterproof liner and set the full bladder horizontally on top. Absent a dedicated external hydration sleeve, this technique provides the easiest access to your hydration bladder for refilling and puts the least amount of pressure on it. My hydration bladder is from 1997 and the tube is only pressure-fit to the bladder, so it can pop off (I should probably superglue it). Modern bladders use quick-release hardware that is less likely to pop off and cause a flood.
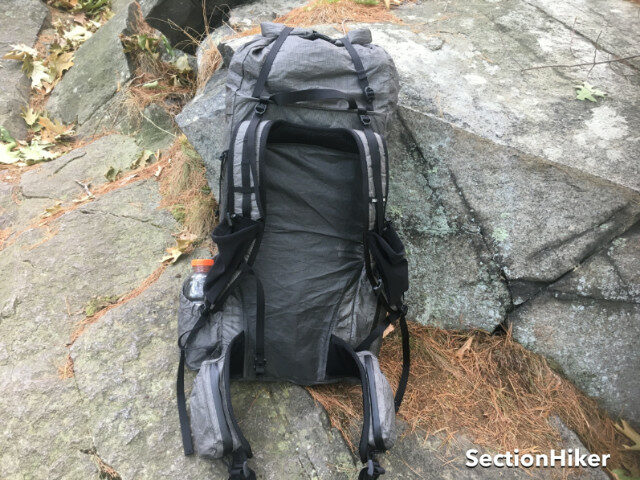
Backpack Frame and Suspension

The frame and suspension of the Kakwa 40 pack include the following elements: a U-shaped internal frame tube, a foam pad, a sewn-on hipbelt with a forward-pull adjustment, shoulder straps on a yoke, and load lifters.
Internal Frame
The frame is a hollow aluminum tube bent in an inverted U shape with contours to follow the small of the back. It cannot be bent further by the user but should work as-is for most. A thin piece of foam provides some protection for your back from hard-edged items you may pack, and, while both can be removed by the user, we don’t recommend it. Removing the frame and pad saves only four ounces and loses the great weight transfer of this design.

Some early purchasers of the Kakwa didn’t realize that there were four total webbing channels that the frame needs to slide into. So when they replaced the frame after removing it, they inserted the frame into the top two channels and missed the bottom two, and thus abraded small holes where the frame ends rubbed up against the fabric. It’s understandable that this happened because the frame channels are hidden behind a ripstop fabric pocket that does double duty holding the frame under tension as well as holding the foam pad. Fortunately, Durston has been covering these packs under warranty until a warning message can be added to the pocket.
The thin foam is similar to what’s used in many sewn-in back panels (I’ve taken apart a bunch of backpacks and seen it) but it is more like a plastic packing foam than your standard sleeping pad foam. The pocket that houses both frame and pad is a very tight fit, but this tight fit is important for locking the frame in place with no wiggliness.
Shoulder Straps
The shoulder straps are S-shaped, which is better for people with more developed chests than J-shaped straps because they curve around the chest instead of running directly over it and pressing against it. There is a bar-tacked daisy chain running down the center of each strap, which continues behind the built-in stretch pockets, which are attached at the top and bottom only. The sternum strap hooks to the daisy chains behind the pockets. Because of the daisy chains, you could add shoulder strap pockets over the stretch pockets if you prefer a different style of shoulder pockets (maybe with a zipper, or with padding for a camera) to the built-in stretchy ones. Or, if the pockets ever rip, you could cut them off and have full daisy chains to rig up their replacement.

Instead of the shoulder straps being sewn on individually, they are joined together in a yoke. This means the load is spread across a much longer seam, which can help prevent the shoulder straps from ripping out.
Load Lifters
The load lifters are attached to a fixed point on the shoulder straps, and to the back panel 3 inches above the seam the shoulder straps are sewn into. They share a seam with the top flap of the frame pocket. Sharing this seam provides a strong connection to the top of the frame, which is held in place by the top of the frame pocket. Tightening the load lifters had a significant effect on moving the top of the frame closer to my back for more stability.
Hip Belt
The hipbelt is a sewn-on, wing-style hipbelt with 3D mesh against the user. Each wing is 10” long, and they are sewn onto the pack 6”-6.5” apart (the width tapers up a half inch from bottom to top). From end-to-end, the hipbelt wings measure 26”-26.5”. The webbing makes the hipbelt adjustable from 28”-42”, but folks on the larger end of that spectrum may find that the hipbelt wings don’t wrap far enough around the front of their hipbone to provide optimum weight transfer. I suggest you use a tape measure on your own hips and use the specs we give to see where the belt would end for you. Larger hipbelt (longer wing) sizes may be introduced later by Durston Gear.

Looking inside the hipbelt pockets, I can see the texture of the hipbelt foam, which is not flat, but subtly contoured with small hills and valleys, presumably for a more flexible wrap. The hipbelt has a forward-pull adjustment to tighten the belt. The webbing is sewn onto either wing in a sideways V shape to allow for conical tightening (i.e. wider at the bottom, narrower at the top) but each side adjusts with a single pull and there is a single center buckle to close.
Max Recommended Load
The ends of the frame terminate right where the hipbelt attaches to the pack, so the load transfer to the hips is excellent. The carry is very good and comfortable with moderate loads.
At 20 pounds, I felt as good as I do when carrying 10 pounds or less in a frameless pack. Between 30 and 36 pounds, I was still impressed by the carry but noted that, on especially hot, sweaty days, I needed to really crank down on the hipbelt to prevent slippage down my back between the two hipbelt wings, where there is slippery Ultra fabric instead of 3D mesh. I tried the pack with 40 and 45 pound loads too, but for my small frame, I would prefer to switch to a load-hauling pack at those weights. The Kakwa’s sweet spot for me is 15 to 30 pounds, but your mileage may vary.
External Attachments and Compression
External attachments and compression on the Kakwa 40 are quite simple, consisting of a single tier of static cord and lineloc tensioner on either side of the pack, and a Y-shaped strap of webbing that goes over the top of the pack. There are also a few small loops of grosgrain through which additional attachment points can be rigged up.
Grosgrain Loop

There are two tiny grosgrain loops at the base of the front mesh pocket, and 4 grosgrain loops (2 per side) that the side compression cord attaches to, that have enough room to run an additional cord through. You could attach trekking poles or an ice ax by rigging up a loop of cord through one of the grosgrain loops at the base of the pocket and a loop of shock cord and a cordlock through one of the grosgrain loops at the top of the pocket where the side compression attaches. Or you could criss-cross shock cord through the four pieces of grosgrain around the pocket to create additional compression for items in the pocket or a place to stow wet gear outside of the pocket.
Side Compression Cord
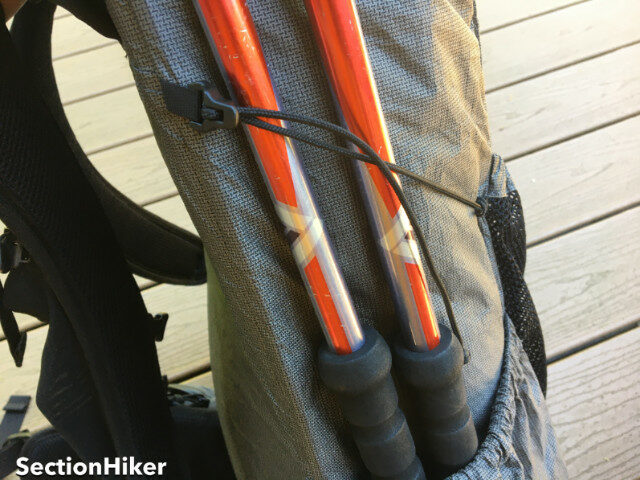
The static cord is good for hanging socks to dry, or stabilizing long items in the pockets like tent poles or a fishing rod. It’s easily user-replaceable if it breaks or if you need a longer cord. It is limited in the amount of compression it provides and is not sufficient for strapping heavier items like snowshoes to the sides of the pack. The only way I can see to attach snowshoes is on top of the pack, under the Y strap.
Y Strap
A Y strap is often described as having two functions: providing compression from the top down, and strapping large items to the top of a pack. In my experience, rolling the top of a roll top pack is sufficient by itself for top compression, and you can clip the top together in a way where the clipped loop lies flat instead of sticking up and snagging on brush. The top of the Y strap attaches next to the load lifters, adjusts on one side with a ladder lock buckle, and is permanently attached to the other. The “leg” of the Y strap attaches at the top of the mesh pocket on the front, and connects to the “arms” of the Y with a quick release, adjustable buckle. That’s right–there are two points of adjustment on the length of the Y strap. This is helpful for maximizing the wrap of the two arms over whatever you’re strapping on, as two straps are better than one for security.

The Y strap can be used to carry snowshoes, a tent, a foam sleeping pad, or a bear canister, depending on your needs–but not all at the same time! It is a good idea, when strapping critical gear to your pack, to have some form of redundancy to keep it connected to you in case it slips out while you’re walking. In the case of a tent, you might use a mini carabiner to clip the stuffsack drawstring to the side compression cord.
If you are not using the Y strap to attach additional gear, you really need to have it clipped closed to keep its webbing out of the way, but this creates an additional step to getting into your pack.
Bear Canister Compatibility
Durston says a Bear Vault BV500 fits vertically inside the main compartment or can be strapped to the top. Many bear canister users like to keep a bear can out of the main compartment to free up space, but it’s perfectly acceptable to carry it inside if you don’t need all the space for your other gear. It would be helpful for Durston Gear to publish a chart of which other canisters on the market could fit inside, either horizontally or vertically.
I tried strapping both a Garcia canister and a Bear Vault BV500 to the top. Although I hadn’t completely filled the pack to capacity, I could just barely connect the strap over the top of a BV500 with the strap completely maxed out from both adjustment points. If I had a fuller pack, I wouldn’t have had enough strap length to close it. A Garcia canister fit better, allowing me to cinch the strap down a couple of inches. But extra strap length here would be most welcome.

The Y strap held both models of bear canister securely through dynamic movement, with a slight edge to the Bear Vault, whose multiple ridges allowed the Y strap to sit between them. If you decide to carry a bear canister on top, one way to minimize the top-heaviness of your pack is to keep your food in an odor-proof bag inside your pack and run the canister empty strapped to the top. Then you fill it when you get to camp.
I tend to cut off permanently-attached top straps to sew on hardware to make them removable, and will likely do the same thing here. That would allow me to remove it entirely when it’s not needed, making it quicker to access the main bag, and also to customize the length of webbing to whatever I might strap on top.
Materials
The Kakwa 40 uses Challenge Ultra 200 fabric throughout most of the pack. The only exceptions are the stretch mesh shoulder pockets, 3D mesh on the inside of the hipbelt and shoulder straps, non-stretch polyester mesh for the front pocket, and ripstop material for the internal frame pocket.
Ultra, a blend of 67% Ultra High Molecular Weight Polyethylene (branded versions of this fiber are known as Dyneema and Spectra) and 33% recycled polyester with a recycled waterproof film backing, has taken the backpacking world by storm among innovative cottage manufacturers but has yet to be adopted by slower-to-change mainstream companies whose gear is sold at retail shops. Its claim to fame is light weight with high water resistance and extremely high abrasion resistance in lab testing (the Taber test), while also being softer (to touch) and quieter than many laminate fabrics. It currently comes in 4 deniers (100, 200, 400, and 800), with higher numbers being increasingly durable but also increasingly heavy.
Philip wrote more about Ultra fabric here, in a comparison with Woven Dyneema.
Water Resistance
Ultra fabric’s fibers don’t absorb water, so the pack dries very fast when it gets wet, and it’s backed by a waterproof film for more water resistance. However, because of the complexity of the seams around the frame assembly, the Kakwa is not seam taped or seam sealed–the seam allowance is bound with grosgrain. This means it’s important to use a waterproof liner–a practice that’s a good idea with most any backpack that’s not a legit drybag–in the rain or when packrafting, to keep your gear dry.
However, a greater issue in terms of water resistance of the Kakwa 40 is the fact that the side pockets do not have drain holes. I like to test water resistance by bringing gear into the rain close to home (without using a liner) before taking it on a trip. After bringing it out in a torrential downpour, I noticed that the items in the bottom of my pack were damp, despite the fact that the roll top was tightly sealed. The higher items were packed in the backpack, the less wet they were. This was confusing to me. I looked into the side pockets and noticed the interiors were wet but not holding large amounts of water.

So a few days later I did a test where I poured a liter of water into one of the side pockets while the bag was empty. I saw that, since there are no pocket drain holes, the water seeped out through the seams. I noticed water dripping out of the seams of the pocket on the opposite side, even though I hadn’t put any water into that pocket. Looking into the body of the pack, I saw that water was entering the main bag through the seams, puddling at the bottom, and then seeping out through the pocket seams on the other side.
Obviously, this was an extreme test–pouring a liter of water into a pocket is a high-pressure scenario, and I always use a pack liner with all packs, regardless of how well-sealed it is. Also, there is some extra protection of the pockets in the way that the Kakwa’s built-in wide elastic tends to curve the top of the pocket over and around the gear, creating a partial “umbrella.” I had this pack out during two more downpours during my testing period where a small amount of water entered the main compartment, and I believe that water entry wouldn’t have been as much of an issue if there were drain holes in the side pockets that let the water out rapidly before it could seep through the seams. If you recreate in an arid environment this may be moot to you.
Comparable Ultra Backpacks
| Make / Model | Total Volume | Fabric | Weight |
|---|---|---|---|
| Durston Gear Kakwa 40 | 55L | Ultra 200 | 27.8 / 770g |
| Zpacks Arc Haul 50 | 50L | Ultra 200 & 100 | 20.4 oz / 577g |
| ULA UL24 Ohm | 63L | Ultra 200 & 400 | 31.8 oz / 902g |
| LiteAF Ultra Curve 46 | 61L | Ultra 200 | 31 oz / 879g |
| Bonfus Framus 48 | 48L | Ultra 200 | 25.4 oz / 720g |
| Mountain Laurel Designs Exodus | 55L | Ultra 200 & 400 | 18 oz / 510g |
| Volpi Outdoor Gear UL 40 | 45L | Ultra 200 & 100 | 14.8 oz / 420g |
| Superior Wilderness Designs Movement 50 | 50L | Ultra 200 | 23.8 oz / 675 |
Recommendation
For me, the Durston Gear Kakwa 40 nicely fills a niche between my ultralight frameless pack and my enormous framed pack. It lets me carry loads that would be uncomfortable for me in a frameless pack but for which a heavy load hauler would be overkill. The low weight is impressive for a framed pack, especially considering that ours came in under spec! The pocketing is fantastic for accessing what you need during the day without stopping. The design, carry and features would be great even if a more conventional pack fabric was used, but if you’ve been curious about trying a pack made from Ultra fabric, the Kakwa 40 is one of the least expensive Ultra packs on the market today.
Likes
- Great load transfer at 20-30 pounds
- Clean, streamlined design without a lot of straps flapping around
- Hipbelt pockets that easily open and close with one hand
Unique QuickPocket is a perfect place to store and access a map on the go
Versatile, secure and easy to use shoulder strap pockets
Room for improvement
- Add drain holes to side pockets
- Make the over-the-top Y strap longer for bear canisters
Disclosure: Durston Gear donated a backpack for this review.
Durston has come out with some really great gear, but none of that really matters if its never actually available. This pack is no exception, currently being available only in small. There are too many great alternatives to his tents and packs that one can purchase without wait lists, midnight drops, etc. Gear design is important, but so is actual manufacturing and distribution. Unless their business plan is to be the next Melenzana and cater to the IG crowd, Durston continues to fail miserably by offering UL, innovative unicorns.
Valid criticism. Durston Gear is following a classic startup bootstrapping strategy in a challenging offshore manufacturing environment but losing a lot of business in the process. I always thought Zpacks was crazy for building a local US sewing and manufacturing facility but it was clearly a brilliant business move.
I think it was a mistake to jump in with Massdrop/Drop in the beginning. Instead of an organic growth model such as Zpacks and Lightheart who largely took orders as only as they could be fulfilled, Durston Gear’s unsustainable approach was to jump in with a relatively large quantity of a design that was only available periodically – which soured a lot of potential customers. Even worse, the decisions of when and how much inventory to manufacture seemed to be out of their hands.
I’ll admit I got caught in the hype and bought a Xmid 1P when the were first offered on Drop. I set it up once, thought it was interesting, but really didn’t see what hole it filled in my gear collection. Thanks to all the unfulfilled demand, I was able to resell it for what I had paid for it. If I were Dan, I’d seriously be considering just licensing my designs to a company that has manufacturing and distribution capabilities. The alternative is to take on some funding to enable them to hire professional management and do their own onshore manufacturing.
John, I hear you: it *is* enormously frustrating when a product you want is difficult to get, but clearly no manufacturer wants this to happen either!
A bigger issue imo is when small companies grow too fast and lose their grip on quality control and customer service. Having an otherwise good product plagued with quality control failures and unhappy buyers is much, much worse than having an excellent well-serviced product that is difficult to get hold of, but which is perfect when you do. We all know companies that have expanded too fast. Even in the Kakwas case, there were a few issues in this first batch that required returns (instantly, without argument, openly, publicly) and there will no doubt be design tweaks to future batches; again, perfectly normal.
Complicating everything is that these are cottage, often Mum and dad companies – literally in the Durston case! – with big cash flow challenges, without the backing of shareholders. We all know how expensive dcf tents are, no wonder the initial xmid pro relied on preorders to get off the ground. Those preorders only happened because there were so few quality control issues with previous products, and buyers trusted the company implicitly. These are priceless assets that should not be risked in a rush to bring product to the marketplace too fast.
When you think of the speed of the expansion of the Durston company, it is still an impressive feat ( I too bought during the inaugural batch of xmid 2 p on Massdrop just – what? 2?3? – years ago. Durston have maintained the goodwill of their customers and fans by being consistently open and honest about any problems or issues. We can’t expect cottage companies to perform like multinationals: even the long- established Tarptent does not keep all their excellent dcf models in stock at all times.
We have a Pro tent that we preordered and will be testing over the next 6 months. I didn’t get up at midnight to preorder and it was still available when I hopped online in the morning Oz time.
It is difficult being a startup at any time but when you think of the effects of Covid on supply chains of outdoor gear in the past two years, it’s all the more remarkable. I imagine they are the envy of cottage companies everywhere: not having enough stock is a good problem to have!
Though understandable, I see it differently. If I was to have a start up with my name on it, I would want it to be produced at the highest quality manufacturer and also one that is proven, just as Durston has done. Unfortunately, it has been hindered by the usual supply chain issues. In this case, the pack was plenty available until small recently. I’m guessing that the original tent demand was unexpected. It may hurt business in the short term but suspect that it will pay off in the long run.
In fact, looking at their website just now, they have large available again (maybe a return?). They had medium available until a few days ago.
Ugh. Please allow me to correct a typo…”the pack was plenty available until JUST small recently.
Hi John,
It’s not our intention to make our gear hard to get, and things are improving greatly on that front. This pack that you say is ‘never actually available’ has been in stock for the last 3 months with zero wait. Yes we did sell out of medium today (coincidently – we were almost out before the review), but there are still small and large in stock now and we will have a restock on all sizes in about 12 weeks that will keep it in stock for a long time after that.
So the situation here is quite different than ‘waitlists’ and ‘midnight drops’ (the latter of which we’ve never done).
The tents have been more difficult due really high demand. I seriously doubt any company could scale up production more than we have – basically going from 0 to volume similar to Zpacks in 3 years while they had 15 years. We have much better tent production coming online in the next month, and we’ll be able to keep all of our tents in stock starting in the new few months.
Agreed. Been scavenging the web the past few weeks for a similar 40L pack. No way I can just sit and wait until Feb. But so far, no luck – so huge credit to Dan on that front. I understand the obstacles keeping these in stock consistently…just pretty frustrating. If I do in fact find something comparable in the coming weeks, I will have no choice but to go for it.
Greg – looks like another pack filling that in between niche as you stated. I would like to see this pack with a BV500 or Garcia canister packed vertically. It seems like it would take up quite a bit of real estate if packed in side the pack. The length of the Y-strap is definitely a concern, unless you can pack a smaller canister internally, which definitely limits the number of days you can be out. With the fact that more places are recommending/or requiring bear canisters, making a better attempt to secure them out of the pack would make sense.
While the Durston tents get good reviews and seem to offer a good alternative design, but I will be surprised if this pack gets that type of press hype.
As John states above, there are many good alternatives and the long wait times or having to wait for drops of very limited quantities, is probably not for the average person. I personally buy most of my gear from cottage industries, but even ones that do not stock what I am looking for, provide a reasonable time frame for turnaround.
Durston Gear is coming out with a higher volume version of this pack…eventually, so that’s probably the one you want for a bear canister. Although I like Greg’s idea of packing your food bag in your pack and carrying the empty canister up top where it’s easily managed. That is such an obvious win.
For years I had a pack that my Garcia can only fit in the very bottom. So I routinely packed my sleeping bag in the bear can lined my sleeping bag stuff sack with an OP sack and carried my food on the top right behind my shoulders.
Over time I noticed the ridge in the bear can was slightly scuffing the reinforced pack bottom so switched things up folded my air pad to cushion the bottom & put the bear can in second. If 1-2. Breaths are left in the air pad it totally cushioned the little Garcia ridge.
For me a full Garcia weighs 21 to 22-1/2 lbs and lasts 12-14 days in warm conditions. Left in the can that weight felt like a cannon ball no matter where I put it; but packed in a stuff sack it carried just fine.
FYI- I only bring real food- I don’t mind the extra weight. I feel better at the end of a long day when I eat real food…
Thanks for the kind review. I’m glad you found the pack comfortable and user friendly.
Regarding the drain holes, I’ve historically been wary of drain holes mostly because a lot of them use metal eyelets that can fall out to leave a rough cut hole – but of course there are better designs. In my testing I found that rain will drip out the edge seams about as fast as it can collect from rain, so the common worry of the pockets filling up with water shouldn’t occur. That was my rationale for omitting them. But you raise a good point that this method may result in greater water pressure and thus internal leakage compared to traditional drains holes. That’s a good point. Certainly since the pack is not seam taped this can occur. (We don’t seam tape the pack because many of the seams are too complex to do this (eg the frame seams)). I find that a bit of water will get in the pack here and elsewhere in all day rain, but manageable amounts with my system of having important stuff in waterproof stuff sacks. For those that want a higher level of waterproofing we recommend seam sealing the pack. That could be done on all seams including the side pocket ones so that water can still drain out the external seams without seeping into that internal ones.
I have a favorite pack that came without drain holes. After the side pkts filled with water, I heated an awl and burned a small hole in each pkt. They worked, and have held up.
Greg, thank you for the detailed review. One question for clarity – you said two water bottles were a tight fit in the side pockets. But which 2 bottles, the 20 oz Gatorade bottle shown, or 2 Smartwarter bottles (LD hiker favorites)? Please clarify.
As for drain holes, wouldn’t a hot poker melted drain hole work? Maybe with a dab of Seamgrip to prevent delamination issues? No experience with the fabric, so not sure, but I would like to know.
As for the wait time complaints, even REI and Backcountry have a hard time getting certain packs and tents from the leading companies. Many supply chain issues cannot be controlled and no company gets a free pass. It’s a global issue still to this day.
Thanks, Bill. Good question and thanks for the opportunity to clarify. When I used two bottles in the same pocket, they were either a 32 oz classic Gatorade bottle or Nalgene next to a tall 1 liter SmartWarter bottle. In the tall pocket, it wasn’t a problem because you can’t access that pocket on the go. But when I used two bottles in the angled pocket, pulling out one bottle made the other bottle pop out (because the pulling motion lifted the other bottle). It’s not that it was too hard to get two bottles in at the beginning, it was more that they didn’t play well together on the go. I only have one tall SmartWater bottle in the house right now; it’d be interesting to see how 2 SmartWater bottles work together in the angled pocket.
I think you are right about melting a hole and that’s most likely the method I’ll use. I like your idea of using SeamGrip as a preventative against delamination, although, if delamination were to occur, it would just be localized to the open pocket (wouldn’t spread to the main bag) where the backing film is less important.
The other possibility I considered was to pick open about a centimeter of the bottom seam, and then hand sew reinforcement stitching on either side to prevent the seam from opening up further. But I think this is a much more complicated modification because of the internal grosgrain seam binding, and it would be quite difficult on the double layered pocket. But the thinking here was inspired by packs whose pockets just have a little space (usually a corner folded over) where they don’t quite meet the seam to allow for drainage.
Do the shoulder straps being “yoke”” style compared to traditional, make them more comfortable on a person’s shoulders?
Hi Cheri, thanks for your question. Not necessarily. Getting a good fit with a yoke is super important. One thing about a yoke is that the attachment point tends to sit lower than traditional individual straps, further down your back. The connection between the straps goes across your upper back, so you tend to have more wrap of the straps around your shoulders. The close up picture of the bear canister under “Y Strap” shows what I’m talking about. A yoke is not the only way to achieve this degree of wrap but it is a feature of yoke design. Some yoke constructions on other packs I’ve tried, especially day packs, overdo the wrap in my opinion, and make the fit feel odd and the load less stable–especially if there are no load lifters. Hopefully that makes sense.
Hey Dan!
Why not make the bottom of the side pocket out of uncoated Kevlar it would drain like a sieve & be ultra durable?
This backpack rocks. I was critical of the original Drop 40 pack because I felt like it was a bit small for its stated 20 inch torso fit. Dan made a large model this time and it’s excellent. I really don’t think you’ll find an ultralight pack at $250 that carries did this well. Kudos to Durston Gear!
Greg and Dan,
I personally cant wait till the large is back in stock. If the quality of this pack is anything like my x-mid p1 (v1) I want this pack. I got my x-mid in 2020, I have more then 60 nights in it in the White Mountains and I could not be happier. It is holding up great and I am tough on gear, very tough. The only thing I would like to see is maybe an option that lets us know when it is stock would be great. I am a big guy and the large is the only one that will fit me. It is nice to see the thought that went into this pack. I cant wait to try it out. Dan thank you for keeping the price point reasonable it makes it easier justifying the purchase past my wife.
I apologize, I bought the last large Kakwa. It should arrive Saturday.
Thanks for the kind words Rikk. We do have a notification list like you’re asking for. You can put down your email for a notice on our Kakwa page here:
https://durstongear.com/product/kakwa-40-backpack
For those of us that have ordered a Kakwa 40 will we get an email in Feb or March 2023 telling us when to expect delivery?
I suggest you go to the Durston Gear website and contact their support folks. I don’t sell gear here.
Greg – thanks for the review. I have a question regarding the hip belt. You make it sound like the hip belt is sewn on wider at the bottom and narrower on the top, by 1/2″. On the pack I have it’s actually the opposite: wider at the top by 1/2″, and then it tapers from top to bottom, so it’s narrower at the bottom. So I’m unsure whether there’s a typo in what you’ve written, or if there’s significant manufacturing variability in this pack which leads some to be wider at the top, and others to be wider at the bottom.
I’ve found the belt getting wider at the top to be a significant issue for hip belt fit. Unfortunately it leaves the top of the belt loose as it wraps around my hips, and leaves a narrow strip around the bottom where all the pressure is concentrated. This also has the effect of making the pack ‘slump’ (because the top of the belt is not holding the body of the pack effectively against my body, so the whole pack can pivot downwards), which drops weight onto my shoulders, makes the load lifters horizontal etc, making the load carry less effective.
It seems that at least some other people have the same issue of the load concentrating around the bottom of the belt because it won’t contour over the hips effectively (see Eileen Y review from 08/04 on the kaviso website). It seems maybe this problem is more apparent on slimmer folks. Something to bear in mind for those considering this pack.
I’m a bit confused by the design decision to make the wings wider at the top (not personally aware of other packs that do this). Typically they would either be vertical (same width top & bottom – often the case with removable hip belts), or in many cases even angled narrower at the top. This presumably would give a better wrap over the hips for slimmer folks, while not compromising fit for larger folks as there would be a bit of ‘give’ there.
Overall though, I found the pack design to be excellent, and the features spot-on.
You are correct, GD. I used the confusing phrase “tapers up a half inch from bottom to top” to mean “increases in width a half inch from bottom to top,” but I should have used that second phrase for better clarity. Since “taper” means “to narrow,” “tapering up” is not really a thing.
Several users have commented on the Durston Gearheads Facebook page that there is some wearing of the fabric on the outside of the pack where the frame ends down by the hipbelt. Dan is aware of this problem and hopefully it will be fixed in the next batch of packs.
Yes on a small number of packs (about 1%) there can be wear at the bottom of the frame (really just depends how it fits on the hips). We’ll have an update for this in our next batch expected about December.
I purchased the Kakwa Large shortly after they became available and received it within 4 days. I love this pack because it is so comfortable and the zippered side pocket stashes my beanie and visor perfectly. In the past I would squeeze them in among my water bottles in the side pocket where I worried I would pull them out or keep smashing them when I put the water bottle back in. Genius, love it! The price is also a good value.
I actually ordered one of these in a medium. I am looking for a pack without a wrap-around belt (which I absolutely hate) to replace my aging Zpacks, which doesn’t have this feature. I find that the wrap-around belt creates a ridge in my back that I find to be uncomfortable. I tried an updated ZPacks pack with this feature and couldn’t get to like it, so returned it.
However, I am returning the Durston pack. Why? I really like the way it feels and carries, and, of course, it doesn’t have the hated wrap-around belt. But, it’s just not wide enough to fit my sleeping bag and my neoair side by side in the bottom, which I can easily do in the ZPacks. Therefore, even with my lightweight gear, it’s just a touch too small.
Therefore I am hoping to purchase the larger pack slated to be available next year, which I presume will be a bit wider.
My other option is to order a pack to my specifications from KS Gear made by the French guy living in Japan. I already have a small pack from him that I use for winter day hiking when I have to carry more gear for a day hike. And, no wrap-around belt. I know these belts are convenient because they are interchangeable with different sizes, but I wish ZPacks hadn’t gone that route or at least had a choice of packs without that option.
Kudos for Dan for making some really good gear!
I have a Kakwa 40 and have put a lot of miles on it already. Would love to see a longer strap for my bear canister but that is the only improvement. Well, unless it could be made in a custom red color – my favorite. The gray is actually really nice though. It is so comfortable to carry! I switched packs with a friend that had a tiny daypack on one of our hikes. She said that the Kakwa felt no heavier than her small pack once on her back, even though it was fully loaded (about 23lbs). Really nice piece of gear.
Get a BEYOURD Buckle Strap Set 5/8 Inch: Nylon Webbing Straps 6 Yards, Quick Side Release Plastic Buckles Dual Adjustable 6 Pack, Tri-Glide Slide Clip 12 PCS, Metal D Rings 6 PCS, Black from Amazon for $10. The male buckle half from this kit slides right into the female buckle half on the Kakwa top Y strap and clicks nicely. The female half of this buckle needs to be adjusted by filing it a bit so that the male half on the Kakwa slides into it and firmly clicks. Then, create a strap that is ~18″ long, flame seal the cut ends, put it through the the clips (plus use one of the tri glide slide keepers on the female side) and you will have a sturdy extension that allows attaching a Bear Vault canister to the top of a fully loaded Kakwa 40. Plus, you will have enough strap and buckles left over for many additional gear mods!
I also have this pack, I’m really happy with it. One thing, I can’t get my BV450 to stay strapped in on top, it slides out eventually from the y strap. So I’ve restored to having it part way in the roll top for stability, but the pack doesn’t fully close then.
Thank you for the detailed review as it answered a question about being waterproof. I took my new pack out on the trail this weekend in rainy weather for only a few hours. All my items in the hidden pocket were soaked as well as the main compartment. I was really disappointed as I was led to believe that the pack was mostly waterproof, which it is not. I actually thought I might have a defective bag. Now I will have to put everything in plastic bags that I don’t want to get wet. I would recommend that Durston not advertise it as waterproof unless they seal the seams to make it so.
We don’t advertise it as a waterproof pack. We say the material is waterproof but the seams are not taped (because the frame makes the seams too complicated to do that) so it ends up as a highly water resistant pack.
I personally use silnylon stuff sacks for my sleeping quilt, clothes etc anyways, and find I don’t get more than a little bit of water in the pack so that system works well to keep stuff dry and organized, but you can seam seal the pack if you want to make it waterproof.
How many trips and miles did you use the pack?
Hi Matt, sorry for my delay in responding. I used the pack for 6 day hikes/ training hikes up to 10 miles each, and a 3 day, 2 night family trip in the White Mountains of NH. For the day hikes, I packed the bag with a full overnight kit.
Your are reviewing size M right? What’s your torso size? Mine is around 19-19.5 which falls between size M and L. Which size should I go for?
That’s right; I reviewed a size medium. Pack fit is extremely personal—what works for me may not work for you— but I’ll share my experience. My torso size is 17.5” which is on the cusp between small and medium. You can contact Dan for his opinion, but I’m glad my pack was sized up, not down. Also be sure you check the hip belt measurements—there is a 1” difference in padding (and overall length) between M and L pack hip belts. If you get the wrong size, the Kaviso website says they have free shipping and returns.